Chapter 24: I/O Redirections
Index
- Introduction
- Standard Output Redirection
- Standard Error Redirection
- Redirecting Both Standard Output and Standard Error
- Standard Input Redirection
- Truncate With Redirection And Null Command
- Manipulating File Descriptors (
exec) - Duplicating file descriptors
- Order of redirections
- Pipes (
|) teecommand- Combining Pipes and Redirections
- Where to place the redirections?
- Block Redirections
- Statement Redirections
- Pipes, Statements and Blocks
- FIFO files
- Summary
- References
In a previous chapter, we explored the concept of processes, the file descriptors associated with them, and the intricate relationship between the two. These concepts form the foundation of understanding how data flows within a Bash environment.
In this chapter, we delve into the topic of redirection—a powerful mechanism that allows you to connect a process’s file descriptors to other programs or files. Redirection enables you to reroute standard input, output, and error streams, offering a flexible way to handle data interactions between processes and external resources.
Introduction
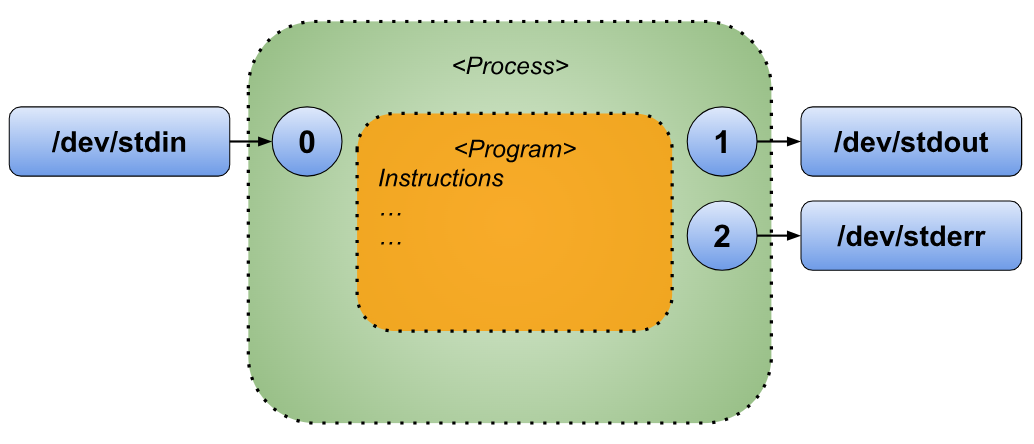
I/O redirection in Bash is a fundamental concept that allows you to control how a script or command interacts with its input and output. By default, when you run a command in the shell, it takes input from the standard input (stdin, usually the keyboard) and sends output to the standard output (stdout, typically the terminal screen). Errors are directed to the standard error (stderr), which also defaults to the terminal. With I/O redirection, you can modify this behavior by rerouting input and output to files, other commands, or even discard them entirely.
At its core, I/O redirection involves three file descriptors:
- Standard Input (stdin - file descriptor 0): The source of input data for a command.
- Standard Output (stdout - file descriptor 1): The destination for normal command output.
- Standard Error (stderr - file descriptor 2): The destination for error messages.
By using symbols like “>”, “<”, “>>”, and “2>”, you can perform operations such as redirecting output to a file, appending output to an existing file, or sending error messages to a separate file. For instance, “ls > output.txt” will save the output of the “ls” command to a file named “output.txt”, while “ls 2> errors.txt” will store any errors in the file “errors.txt”.
I/O redirection is essential for tasks such as logging, filtering data, or chaining commands together for complex processing. For example, combining redirections with pipelines (“|”) lets you pass the output of one command as input to another, enabling efficient data transformation and processing workflows. Additionally, advanced redirection techniques, such as redirecting both stdout and stderr to the same location or creating temporary file descriptors, empower users to handle even the most intricate scenarios.
Learning about I/O redirection not only enhances your ability to write robust and flexible scripts but also gives you greater control over how commands interact with their environment. It’s a foundational skill for any Bash user, enabling the creation of efficient and maintainable automation.
Bash processes redirections sequentially, interpreting them from left to right before executing the command. This sequential processing means that the order in which you specify redirections significantly impacts their behavior. Throughout this chapter, we will explore examples that illustrate how the sequence of redirections can influence the outcome and demonstrate best practices for effectively managing them.
To illustrate I/O redirections more visually, we will employ variations of the following diagram to provide a clear and graphical explanation of the concept.
Standard Output Redirection
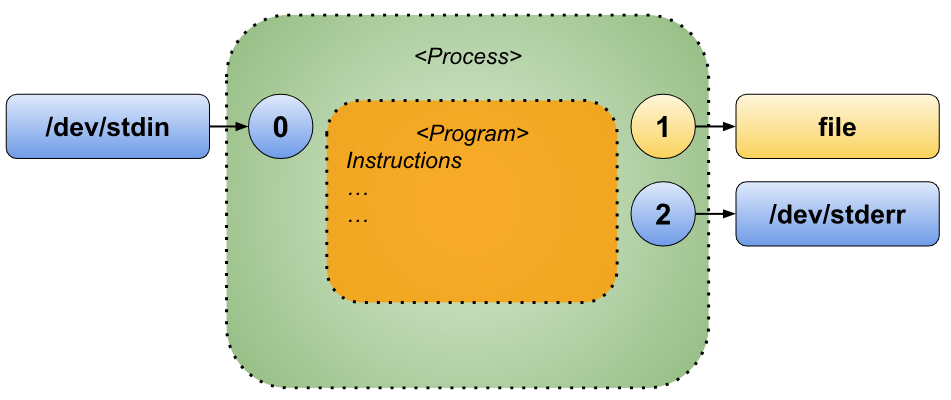
There are two primary ways to redirect standard output in Bash:
- “
command > file” - “
command >> file”
While both methods create the target file if it doesn’t already exist, the key difference lies in how they handle an existing file. In the first method, “>”, the file is overwritten, erasing any existing content. Conversely, the second method, “>>”, appends new output to the end of the file, preserving its original content.
By default, these redirections operate on the standard output, which corresponds to file descriptor 1. However, this can be explicitly specified for clarity or precision:
- “
command 1> file” (overwrites the file) - “
command 1>> file” (appends to the file)
In these explicit examples, you’re directly stating that the output from file descriptor 1 (standard output) should be redirected to the specified file. This makes the operation more deliberate and clear, particularly when working with multiple file descriptors.
Let’s delve into a few examples to see these principles in action.
 1 #!/usr/bin/env bash
 2 #Script: io-redirections-0001.sh
 3 OUTPUT_FILE=/tmp/result.csv
 4 echo "Id,FirstName,FamilyName,Age" > $OUTPUT_FILE
 5 for i in {1..20}; do
 6     echo "$i,FirstName$i,FamilyName$i,$(($i+10))" >> $OUTPUT_FILE
 7 done
 8 echo "End of script"
The previous script creates a CSV file[1] with 4 columns that are:
- “
Id”: Unique identifier of the row. - “
FirstName”: First name of the entry. - “
FamilyName”: Family name of the entry. - “
Age”: Age of the entry.
The previous script will create 20 entries. When we execute the previous file you will see the following output in your terminal window.
$ ./io-redirections-0001.sh
End of script

$ cat /tmp/result.csv
Id,FirstName,FamilyName,Age
1,FirstName1,FamilyName1,11
2,FirstName2,FamilyName2,12
3,FirstName3,FamilyName3,13
4,FirstName4,FamilyName4,14
5,FirstName5,FamilyName5,15
6,FirstName6,FamilyName6,16
7,FirstName7,FamilyName7,17
8,FirstName8,FamilyName8,18
9,FirstName9,FamilyName9,19
10,FirstName10,FamilyName10,20
11,FirstName11,FamilyName11,21
12,FirstName12,FamilyName12,22
13,FirstName13,FamilyName13,23
14,FirstName14,FamilyName14,24
15,FirstName15,FamilyName15,25
16,FirstName16,FamilyName16,26
17,FirstName17,FamilyName17,27
18,FirstName18,FamilyName18,28
19,FirstName19,FamilyName19,29
20,FirstName20,FamilyName20,30
In the most recent example, notice how both types of standard output redirection are utilized effectively. The first redirection, using the “>” operator in the “echo” command, creates a file named “/tmp/result.txt” and initializes it with four columns of data. This action overwrites any existing content in the file, ensuring a clean slate.
The second redirection, marked by the “>>” operator within the “for” loop, appends new rows of data to the already created file. This approach preserves the file’s existing content while adding additional information, demonstrating how these two types of redirection can be combined to structure output incrementally and efficiently.
Standard Error Redirection
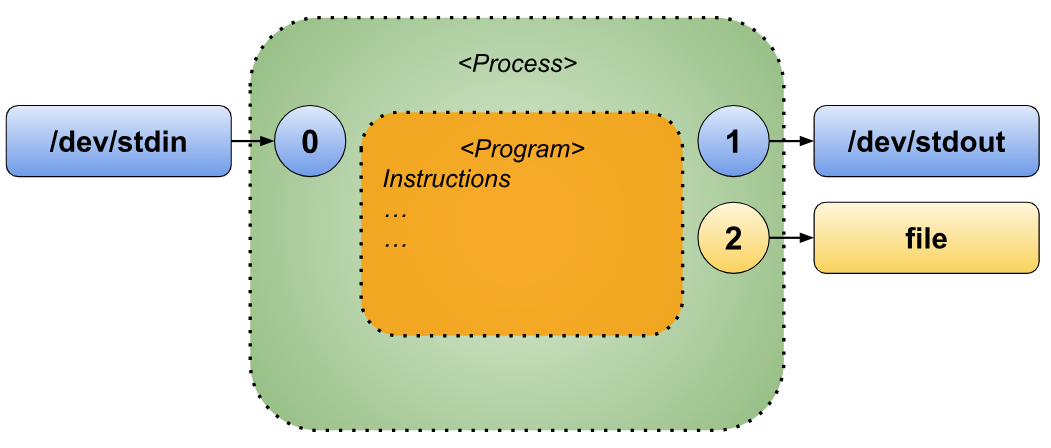
Redirecting standard error in Bash closely resembles the process of redirecting standard output, with one notable distinction: Bash does not have a default shorthand for redirecting standard error, so it must always be specified explicitly.
The explicit syntax for standard error redirection is as follows:
- Method 1: “
command 2> file” - Method 2: “
command 2>> file”
The difference between the two methods mirrors that of standard output redirection. In the first form, “2>”, the file will always be created or overwritten, erasing any existing content. In the second form, “2>>”, the file’s existing content is preserved, and new error messages are appended to the end of the file. This flexibility allows for managing error outputs in a way that aligns with your specific needs, whether starting fresh or building upon previous logs.
Let’s see how it works with the following example script.
 1 #!/usr/bin/env bash
 2 #Script: io-redirections-0002.sh
 3 # Define the file to store standard error
 4 ERROR_FILE="/tmp/error_log.txt"
 5 echo "Beginning of Error Log file" > $ERROR_FILE
 6 echo "Demonstrating Standard Error Redirection"
 7 echo "---------------------------------------"
 8 # Intentionally cause an error by trying to list a nonexistent directory
 9 echo "Attempting to list a nonexistent directory..."
10 ls /nonexistent_directory 2>> "$ERROR_FILE"
11 # Check the content of the error log
12 echo "Content of $ERROR_FILE:"
13 cat "$ERROR_FILE"
In line 4, a variable named “ERROR_FILE” is defined to store the path to the file where error messages will be logged. Then, in line 10, the “ls” command attempts to list the contents of a non-existent directory, which generates an error. Finally, in line 13, the script reads and displays the contents of “/tmp/error_log.txt”, showing the captured error message.
Redirecting Both Standard Output and Standard Error
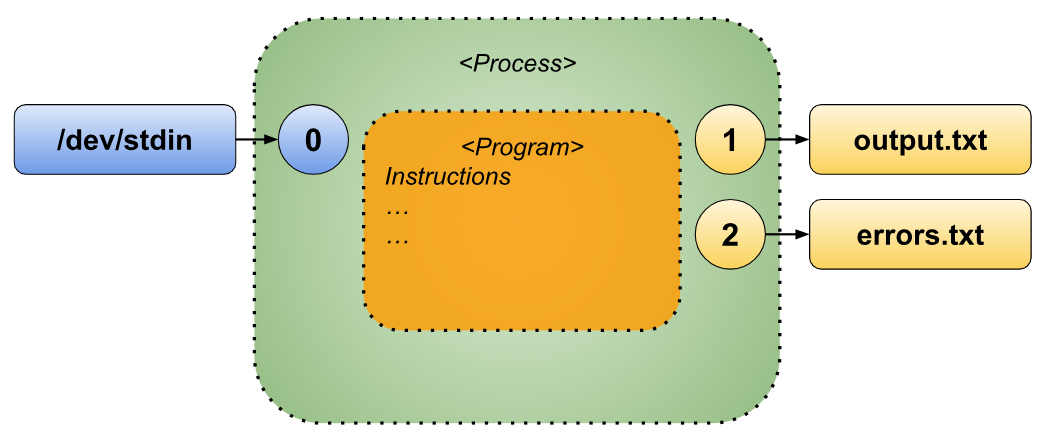
We’ve already explored how to redirect the standard output and standard error individually. Now, let’s learn how to handle both simultaneously during the execution of a command. This can be achieved using either of the following approaches:
- “
command > output.txt 2> errors.txt” - “
command 1> output.txt 2> errors.txt”
In both examples, the standard output is redirected to the file named “output.txt”, while the standard error is redirected to “errors.txt”. The result is a clean separation of regular output and error messages, making it easier to analyze or process them independently.
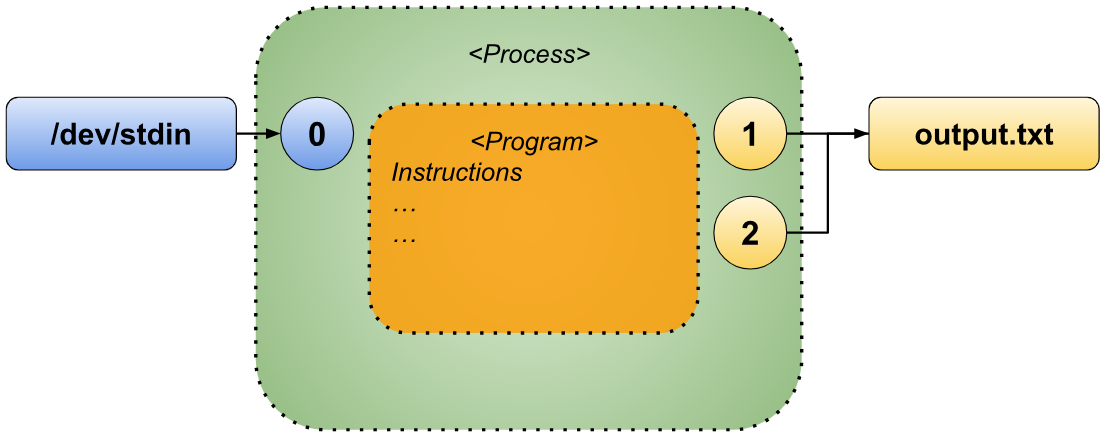
If you want to redirect both the standard output and the standard error streams to the same file, there are several approaches you can take. One method involves explicitly specifying the same file for both streams, as shown here:
- “
command > output.txt 2> output.txt” - “
command 1> output.txt 2> output.txt”
Alternatively, Bash provides a more concise syntax for redirecting both streams simultaneously using the “&>” operator:
- “
command &> output.txt”
If your goal is to append both the standard output and the standard error to an existing file rather than overwriting it, you can use the “&>>” operator:
- “
command &>> output.txt”
This simplifies the process and ensures that both types of output are written together in the specified file, whether you’re overwriting or appending.
Now we are going to see several examples to try out what we learnt in the section.
The first example is going to be redirecting the standard output and the standard error to different files.
 1 #!/usr/bin/env bash
 2 #Script: io-redirections-0003.sh
 3 # Define log files
 4 OUTPUT_FILE="/tmp/output_log.txt"
 5 ERROR_FILE="/tmp/error_log.txt"
 6 echo "Beginning of Output file" > $OUTPUT_FILE
 7 echo "Beginning of Error file" > $ERROR_FILE
 8 # Attempt to list multiple directories
 9 for dir in /home /non_existent_dir /tmp /fake_dir; do
10     ls "$dir" 1>> "$OUTPUT_FILE" 2>> "$ERROR_FILE"
11 done
12 # Display the contents of the Output file
13 echo "Contents of $OUTPUT_FILE (Standard Output):"
14 cat "$OUTPUT_FILE"
15 # Display the contents of the Error file
16 echo -e "\nContents of $ERROR_FILE (Standard Error):"
17 cat "$ERROR_FILE"
The previous script declares two variables in lines 4 and 5, which store the file paths for the log files used to capture the output and errors generated during execution. Lines 6 and 7 ensure that these log files are initialized by either creating them anew or clearing any existing content.
The main logic, spanning lines 8 to 11, iterates over a mix of valid and invalid directory names. For each directory, the “ls” command is executed, with its standard output redirected to the file “/tmp/output_log.txt” and its error output directed to “/tmp/error_log.txt”. This approach ensures a clear separation of successful outputs and errors.
Finally, lines 12 to 17 display the contents of both log files to the terminal, providing the user with a concise overview of the results of the “ls” operations, including any errors encountered. This ensures transparency and makes debugging more straightforward.
When you execute the previous script you will an output like the following in your terminal window.
$ ./io-redirections-0003.sh
Contents of /tmp/output_log.txt (Standard Output):
Beginning of Output file
username
lost+found
tec
byteBuddyAgent4303673871758816542.jar
error_log.txt
gdm3-config-err-rLRc3P
hsperfdata_chemacabeza
kotlin-idea-4047041896916890883-is-running
output_log.txt
result.csv
snap-private-tmp
systemd-private-f9d47cdf3d3b4b06bef78b2dbbe2935b-bluetooth.service-dWX6PO
systemd-private-f9d47cdf3d3b4b06bef78b2dbbe2935b-bolt.service-WKIJbw
systemd-private-f9d47cdf3d3b4b06bef78b2dbbe2935b-colord.service-RBL2Fp
systemd-private-f9d47cdf3d3b4b06bef78b2dbbe2935b-fwupd.service-kYk8pA
systemd-private-f9d47cdf3d3b4b06bef78b2dbbe2935b-ModemManager.service-P94LbT
systemd-private-f9d47cdf3d3b4b06bef78b2dbbe2935b-polkit.service-2svv10
systemd-private-f9d47cdf3d3b4b06bef78b2dbbe2935b-power-profiles-daemon.service-A5nMl3
systemd-private-f9d47cdf3d3b4b06bef78b2dbbe2935b-switcheroo-control.service-sjIK7R
systemd-private-f9d47cdf3d3b4b06bef78b2dbbe2935b-systemd-logind.service-jghpna
systemd-private-f9d47cdf3d3b4b06bef78b2dbbe2935b-systemd-oomd.service-pZLyXz
systemd-private-f9d47cdf3d3b4b06bef78b2dbbe2935b-systemd-resolved.service-ufjpps
systemd-private-f9d47cdf3d3b4b06bef78b2dbbe2935b-systemd-timesyncd.service-fmSMFR
systemd-private-f9d47cdf3d3b4b06bef78b2dbbe2935b-upower.service-WmEyNS
tmux-1000
v8-compile-cache-1000
vzK1Tgb

Contents of /tmp/error_log.txt (Standard Error):
Beginning of Error file
ls: cannot access '/non_existent_dir': No such file or directory
ls: cannot access '/fake_dir': No such file or directory
In the following version of the “io-redirections-0003.sh” script we will forward both standard output and standard error to the same file.
 1 #!/usr/bin/env bash
 2 #Script: io-redirections-0004.sh
 3 # Define log file
 4 COMBINED_FILE="/tmp/combined_log.txt"
 5 echo "Beginning of Combined file" > $COMBINED_FILE
 6 # Attempt to list multiple directories
 7 for dir in /home /non_existent_dir /tmp /fake_dir; do
 8     ls "$dir" 1>> "$COMBINED_FILE" 2>> "$COMBINED_FILE"
 9 done
10 # Display the contents of the Combined file file
11 echo "Contents of $COMBINED_FILE (Standard Output & Standard Error):"
12 cat "$COMBINED_FILE"
If you execute the previous script you will see something like the following output in your terminal window.
$ ./io-redirections-0004.sh
Contents of /tmp/combined_log.txt (Standard Output & Standard Error):
Beginning of Combined file
username
lost+found
tec
ls: cannot access '/non_existent_dir': No such file or directory
byteBuddyAgent4303673871758816542.jar
combined_log.txt
error_log.txt
gdm3-config-err-rLRc3P
hsperfdata_chemacabeza
kotlin-idea-4047041896916890883-is-running
output_log.txt
result.csv
snap-private-tmp
systemd-private-f9d47cdf3d3b4b06bef78b2dbbe2935b-bluetooth.service-dWX6PO
systemd-private-f9d47cdf3d3b4b06bef78b2dbbe2935b-bolt.service-WKIJbw
systemd-private-f9d47cdf3d3b4b06bef78b2dbbe2935b-colord.service-RBL2Fp
systemd-private-f9d47cdf3d3b4b06bef78b2dbbe2935b-fwupd.service-kYk8pA
systemd-private-f9d47cdf3d3b4b06bef78b2dbbe2935b-ModemManager.service-P94LbT
systemd-private-f9d47cdf3d3b4b06bef78b2dbbe2935b-polkit.service-2svv10
systemd-private-f9d47cdf3d3b4b06bef78b2dbbe2935b-power-profiles-daemon.service-A5nMl3
systemd-private-f9d47cdf3d3b4b06bef78b2dbbe2935b-switcheroo-control.service-sjIK7R
systemd-private-f9d47cdf3d3b4b06bef78b2dbbe2935b-systemd-logind.service-jghpna
systemd-private-f9d47cdf3d3b4b06bef78b2dbbe2935b-systemd-oomd.service-pZLyXz
systemd-private-f9d47cdf3d3b4b06bef78b2dbbe2935b-systemd-resolved.service-ufjpps
systemd-private-f9d47cdf3d3b4b06bef78b2dbbe2935b-systemd-timesyncd.service-fmSMFR
systemd-private-f9d47cdf3d3b4b06bef78b2dbbe2935b-upower.service-WmEyNS
tmux-1000
v8-compile-cache-1000
vzK1Tgb
ls: cannot access '/fake_dir': No such file or directory
In the next variation of the “io-redirections-0004.sh” script we will use the “&>>” operator to send both standard output and standard error to the same file.
 1 #!/usr/bin/env bash
 2 #Script: io-redirections-0005.sh
 3 # Define log file
 4 COMBINED_FILE="/tmp/combined_log.txt"
 5 echo "Beginning of Combined file" > $COMBINED_FILE
 6 # Attempt to list multiple directories
 7 for dir in /home /non_existent_dir /tmp /fake_dir; do
 8     ls "$dir" &>> "$COMBINED_FILE"
 9 done
10 # Display the contents of the Combined file file
11 echo "Contents of $COMBINED_FILE (Standard Output & Standard Error):"
12 cat "$COMBINED_FILE"
When you execute the following script you will have an output like the following in your terminal window.
$ ./io-redirections-0005.sh
Contents of /tmp/combined_log.txt (Standard Output & Standard Error):
Beginning of Combined file
username
lost+found
tec
ls: cannot access '/non_existent_dir': No such file or directory
byteBuddyAgent4303673871758816542.jar
combined_log.txt
error_log.txt
gdm3-config-err-rLRc3P
hsperfdata_username
kotlin-idea-4047041896916890883-is-running
output_log.txt
result.csv
snap-private-tmp
systemd-private-f9d47cdf3d3b4b06bef78b2dbbe2935b-bluetooth.service-dWX6PO
systemd-private-f9d47cdf3d3b4b06bef78b2dbbe2935b-bolt.service-WKIJbw
systemd-private-f9d47cdf3d3b4b06bef78b2dbbe2935b-colord.service-RBL2Fp
systemd-private-f9d47cdf3d3b4b06bef78b2dbbe2935b-fwupd.service-kYk8pA
systemd-private-f9d47cdf3d3b4b06bef78b2dbbe2935b-ModemManager.service-P94LbT
systemd-private-f9d47cdf3d3b4b06bef78b2dbbe2935b-polkit.service-2svv10
systemd-private-f9d47cdf3d3b4b06bef78b2dbbe2935b-power-profiles-daemon.service-A5nMl3
systemd-private-f9d47cdf3d3b4b06bef78b2dbbe2935b-switcheroo-control.service-sjIK7R
systemd-private-f9d47cdf3d3b4b06bef78b2dbbe2935b-systemd-logind.service-jghpna
systemd-private-f9d47cdf3d3b4b06bef78b2dbbe2935b-systemd-oomd.service-pZLyXz
systemd-private-f9d47cdf3d3b4b06bef78b2dbbe2935b-systemd-resolved.service-ufjpps
systemd-private-f9d47cdf3d3b4b06bef78b2dbbe2935b-systemd-timesyncd.service-fmSMFR
systemd-private-f9d47cdf3d3b4b06bef78b2dbbe2935b-upower.service-WmEyNS
tmux-1000
v8-compile-cache-1000
vzK1Tgb
ls: cannot access '/fake_dir': No such file or directory
In the next section we will learn about the redirection of the standard input.
Standard Input Redirection
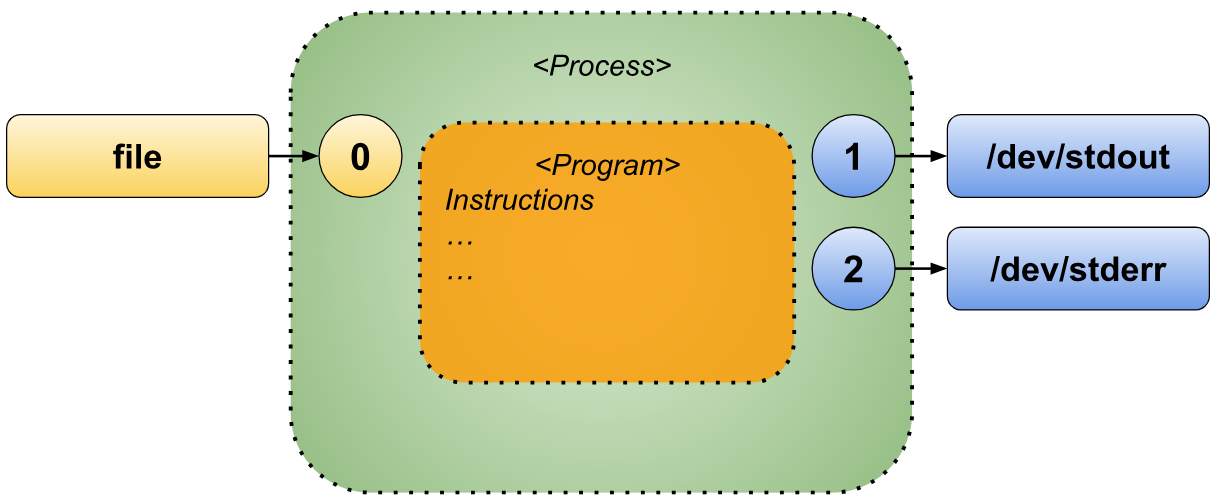
In the previous sections, we explored how to redirect both standard output and standard error, which are used to capture content produced by a script or program.
Now, we’ll shift our focus to understanding how to “connect” an input source—typically a file—to the standard input of a command, script, or program.
Similar to the redirection techniques we’ve already discussed, we can use the following operator to feed input into the standard input stream of a command. The syntax is straightforward:
command < input_file
In this example, the “command” reads its standard input, which is connected to a file named “input_file”. As a result, the command processes the contents of the file.
For instance:
cat < /tmp/stuff.txt
Here, the “cat” command—when run without parameters—reads from the standard input. By using “<”, we connect its standard input to the file “/tmp/stuff.txt”. Consequently, the “cat” command outputs the file’s content to the screen.
Let’s write another example script to put in practice what we just learnt.
 1 #!/usr/bin/env bash
 2 #Script: io-redirections-0006.sh
 3 # Define log file
 4 COMBINED_FILE="/tmp/combined_log.txt"
 5 echo "Printing the contents of the '$COMBINED_FILE' log"
 6 cat < $COMBINED_FILE
 7 echo ""
 8 echo "End of script"
When you execute the previous script something like the following will be printed in your terminal window.
$ ./io-redirections.0006.sh
Printing the contents of the '/tmp/combined_log.txt' log
Beginning of Combined file
username
lost+found
tec
ls: cannot access '/non_existent_dir': No such file or directory
byteBuddyAgent4303673871758816542.jar
combined_log.txt
error_log.txt
gdm3-config-err-rLRc3P
hsperfdata_username
kotlin-idea-4047041896916890883-is-running
output_log.txt
result.csv
snap-private-tmp
systemd-private-f9d47cdf3d3b4b06bef78b2dbbe2935b-bluetooth.service-dWX6PO
systemd-private-f9d47cdf3d3b4b06bef78b2dbbe2935b-bolt.service-WKIJbw
systemd-private-f9d47cdf3d3b4b06bef78b2dbbe2935b-colord.service-RBL2Fp
systemd-private-f9d47cdf3d3b4b06bef78b2dbbe2935b-fwupd.service-kYk8pA
systemd-private-f9d47cdf3d3b4b06bef78b2dbbe2935b-ModemManager.service-P94LbT
systemd-private-f9d47cdf3d3b4b06bef78b2dbbe2935b-polkit.service-2svv10
systemd-private-f9d47cdf3d3b4b06bef78b2dbbe2935b-power-profiles-daemon.service-A5nMl3
systemd-private-f9d47cdf3d3b4b06bef78b2dbbe2935b-switcheroo-control.service-sjIK7R
systemd-private-f9d47cdf3d3b4b06bef78b2dbbe2935b-systemd-logind.service-jghpna
systemd-private-f9d47cdf3d3b4b06bef78b2dbbe2935b-systemd-oomd.service-pZLyXz
systemd-private-f9d47cdf3d3b4b06bef78b2dbbe2935b-systemd-resolved.service-ufjpps
systemd-private-f9d47cdf3d3b4b06bef78b2dbbe2935b-systemd-timesyncd.service-fmSMFR
systemd-private-f9d47cdf3d3b4b06bef78b2dbbe2935b-upower.service-WmEyNS
tmux-1000
v8-compile-cache-1000
vzK1Tgb
ls: cannot access '/fake_dir': No such file or directory

End of script
With this foundational understanding of redirection, we’ll take a brief pause here and revisit these concepts as we explore additional commands in the following sections.
Truncate With Redirection And Null Command
The Null command is a special command that performs no operation—it literally does nothing. This command is represented by a single colon (“:”).
Despite its simplicity, the Null command can be useful, such as for truncating an existing file or creating a new empty file of size zero. Here’s an example[2]:
$ seq 1 100 > numbers.txt
$ : > numbers.txt
In the first command, we create a file named “numbers.txt” containing the numbers from 1 to 100.
In the second command, “: > numbers.txt” truncates the file, reducing its size to zero bytes. This effectively clears its content while keeping the file intact.
Manipulating File Descriptors (exec)
As we’ve seen, a Bash script or program comes with three default file descriptors:
- “
0” for standard input, - “
1” for standard output, and - “
2” for standard error.
However, Bash is not limited to just these three file descriptors. Within a single Bash process, you can use up to nine file descriptors simultaneously.
To open and manage additional file descriptors, you can use the exec built-in command. The basic syntax of “exec” is:
exec [command [arguments ...]] [redirection ...]
Originally, the primary purpose of the “exec” command was to replace the current Bash shell with the execution of another command (along with its arguments, if provided). We’ll explore this functionality in detail in a later section.
For now, we’ll focus on another powerful aspect of “exec”: its ability to work with redirections, which is key to managing file descriptors. This is the part we’ll dive into in this section.
Redirection Syntax
Redirection is a mechanism that allows Bash scripts to interact with various resources on the machine. The general syntax for a redirection is:
<fd><op><rh>
Here’s a breakdown of each component:
- ”
<fd>”: The file descriptor, which is a number between 0 and 9. - ”
<op>”: The operation to perform on the file descriptor, which can be one of the following:- ”
<” : Opens the file descriptor for reading. - ”
>” : Opens the file descriptor for writing. - ”
>>” : Appends data to the file descriptor. - ”
<>” : Opens the file descriptor for both reading and writing. - ”
>|” : Overwrites the file descriptor, bypassing certain restrictions like “noclobber”.
- ”
- ”
<rh>” : The resource that the file descriptor will point to. This can be:- The name of a file.
- Another file descriptor, specified as “
&<fd>” (e.g., “&1” for standard output). - ”
&-” to close the file descriptor.
By mastering this syntax, you can control how your scripts access and manage system resources efficiently.
In the following sub-sections we are going to see some examples.
Redirection of Standard Input
Here’s how we can demonstrate input redirection in a script:
Step 1: Create an Input File
First, we create a file to use as input. This can be done quickly with the following command:
$ for i in $(seq 1 10); do
    echo "Line_$i" >> input_file  # Redirects output to the file
done
This creates a file named “input_file” with 10 lines, each containing the text “Line_1”, “Line_2”, and so on.
Step 2: Create the Script
Next, we write a script to read from the file using input redirection:
 1 #!/usr/bin/env bash
 2 #Script: io-redirections-0007.sh
 3 # Redirect standard input to read from the file
 4 exec 0<input_file
 5 # Read from standard input line by line
 6 while read -r line; do
 7     printf "I read '%s' from the file\n" "$line"
 8 done
 9 # Close the file descriptor
10 exec 0<&-
In the previous script, line 4 redirects standard input (File Descriptor 0) to the file named “input_file”, effectively linking the file to the script’s input stream. Between lines 6 and 8, the script reads each line of the file and outputs it to the terminal. Finally, in line 10, the script closes File Descriptor 0 to release the resource and ensure proper cleanup.
Step 3: Execute the Script
When you run this script, the output will be:
$ ./io-redirections-0007.sh
I read 'Line_1' from the file
I read 'Line_2' from the file
I read 'Line_3' from the file
I read 'Line_4' from the file
I read 'Line_5' from the file
I read 'Line_6' from the file
I read 'Line_7' from the file
I read 'Line_8' from the file
I read 'Line_9' from the file
I read 'Line_10' from the file
Redirection of Standard Output
In this case, we will redirect Standard Output at the start of the script, eliminating the need to manage it throughout the rest of the script.
 1 #!/usr/bin/env bash
 2 #Script: io-redirections-0008.sh
 3 # Redirection of stdout to a file
 4 exec 1>output_file
 5 # Echoing to standard output
 6 for (( i = 0 ; i < 10 ; i++ )); do
 7     echo "Line_$i";
 8 done
 9 # Close the file descriptor
10 exec 1>&-
On line 4, the Standard Output (File Descriptor 1) is redirected to a file named “output_file”. From this point onward, anything written to standard output in the script will be saved to “output_file” instead of being displayed in the terminal.
Between lines 6 and 8 there is a “for” loop that does 10 iterations (“i” ranges from 0 to 9). On each iteration, the “echo” command generates a line with the format “Line_<i>”. Due to the redirection set earlier, these lines are written to the file “output_file”.
On line 10, the File Descriptor 1 (Standard Output) is closed, ensuring that no further output is written to the file.
When you execute the previous script and print the contents of the “output_file” to your terminal you will something like the following.
$ ./io-redirections-0008.sh

$ cat output_file
Line_0
Line_1
Line_2
Line_3
Line_4
Line_5
Line_6
Line_7
Line_8
Line_9
Redirection of Standard Error
In this case, we will redirect Standard Error at the start of the script, eliminating the need to manage it throughout the rest of the script.
 1 #!/usr/bin/env bash
 2 #Script: io-redirections-0009.sh
 3 # Redirection of stderr to a file
 4 exec 2>error_file
 5 # Echoing to standard error
 6 for dir in /fake_1 /fake_2 /fake_3; do
 7     ls $dir
 8 done
 9 # Close the file descriptor
10 exec 2>&-
In line 4, standard error (File Descriptor 2) is redirected to a file named “error_file”. From this point forward, any messages sent to standard error by the script will be saved in error_file instead of appearing in the terminal.
Lines 6 to 8 contain a for loop that iterates three times, with the variable “dir” taking the values “/fake_1”, “/fake_2”, and “/fake_3”. During each iteration, the “ls” command attempts to list the contents of a directory that does not exist, generating an error message. Thanks to the redirection set earlier, these error messages are captured in the “error_file”.
In line 10, standard error (File Descriptor 2) is closed to prevent any further output from being written to the file.
When you run the script and display the contents of “error_file”, you’ll see output similar to the following.
$ ./io-redirections-0009.sh

$ car error_file
ls: cannot access '/fake_1': No such file or directory
ls: cannot access '/fake_2': No such file or directory
ls: cannot access '/fake_3': No such file or directory
Redirection of both Standard Output and Standard Error
As discussed in a previous section, we can redirect both standard output and standard error using the exec command with the same syntax outlined earlier.
Here are some ways to achieve this:
- “
exec 1>output.txt 2>output.txt” - “
exec >output.txt 2>output.txt” - “
exec 1>output.txt 2>&1” - “
exec >output.txt 2>&1” - “
exec &>output.txt”
All these examples accomplish the same goal: redirecting both standard output and standard error to the file “output.txt”.
Let’s see an example.
 1 #!/usr/bin/env bash
 2 #Script: io-redirections-0010.sh
 3 # Redirection of stderr to a file
 4 exec &>combined_file
 5 # Echoing to standard output
 6 for (( i = 0 ; i < 10 ; i++ )); do
 7     echo "Line_$i";
 8 done
 9 # Echoing to standard error
10 for dir in /fake_1 /fake_2 /fake_3; do
11     ls $dir
12 done
13 # Close the Standard Output file descriptor
14 exec 1>&-
15 # Close the Standard Error file descriptor
16 exec 2>&-
The “io-redirections-0010.sh” script combines the functionality of “io-redirections-0008.sh” and “io-redirections-0009.sh”, with the key difference being that both Standard Output (File Descriptor 1) and Standard Error (File Descriptor 2) are redirected to the same file, “combined_file”.
- Line 4: Both standard output and standard error are redirected to the file combined_file.
- Lines 6 to 8: The “
echo” command is used to generate and print 10 lines to standard output. - Lines 10 to 12: The script attempts to list three non-existent directories, generating error messages sent to standard error.
- Line 14: The standard output file descriptor is closed.
- Line 16: The standard error file descriptor is closed.
This script demonstrates efficient handling of output and error redirection to a single file while ensuring proper resource management.
When you execute the previous script and list the contents of the file “combined_file” you will see something like the following.
$ ./io-redirections-0010.sh

$ cat combined_file
Line_0
Line_1
Line_2
Line_3
Line_4
Line_5
Line_6
Line_7
Line_8
Line_9
ls: cannot access '/fake_1': No such file or directory
ls: cannot access '/fake_2': No such file or directory
ls: cannot access '/fake_3': No such file or directory
Opening a new file
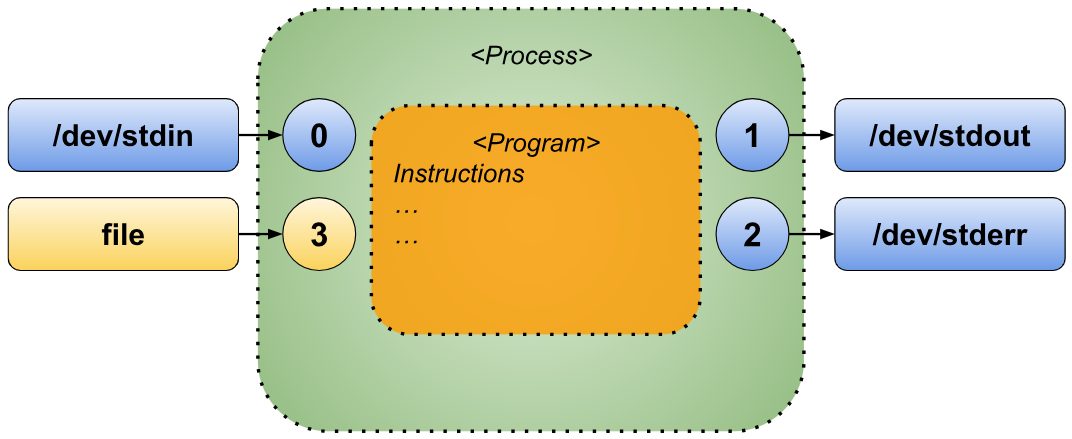
Using the exec command, we can open a file and associate it with a file descriptor other than the standard ones (0, 1, or 2). To do this, we use the syntax “exec <fd><filename”, where “<fd>” is a file descriptor number between 3 and 9.
For instance, suppose we have a file named “lorem.txt” with the following content.
Lorem ipsum dolor sit amet, consectetur adipiscing elit.
Duis varius urna erat, a facilisis mauris vehicula at.
Phasellus imperdiet tristique mauris sit amet posuere.
Duis molestie, purus vel sodales posuere, leo dolor tempor odio,
vel imperdiet quam orci vel diam. Curabitur finibus dapibus gravida.
Duis gravida iaculis condimentum.
Sed ultricies nulla luctus, sollicitudin velit quis, maximus arcu.
Morbi lacinia luctus urna, nec suscipit felis consequat eget.
Vestibulum nec sodales magna, nec placerat velit.
Mauris volutpat tellus neque, quis bibendum magna tincidunt a.
Maecenas faucibus scelerisque enim sollicitudin molestie.
Nunc mauris nibh, semper sit amet tellus eu, auctor egestas erat.
Nunc non pharetra diam. Praesent nec luctus metus.
Pellentesque in turpis nulla.
Mauris vehicula consequat nisl, et elementum nunc dictum at.
Sed fringilla luctus tincidunt.
We are going to write the following Bash script to read the contents of the “lorem.txt” file with the file descriptor 3.
 1 #!/usr/bin/env bash
 2 #Script: io-redirections-0011.sh
 3 # FD 3 associated to reading file
 4 exec 3<lorem.txt
 5 ((i=0))
 6 # Read from file descriptor 3
 7 while read -u 3 line; do
 8     printf "LINE_CONTENT[$i]: $line\n"
 9     # Increment counter
10     ((i++))
11 done
12 # Close file descriptor
13 exec 3<&-
In the previous script we are attaching the file descriptor 3 to the file “lorem.txt” on line 4.
Between lines 7 and 11 we are using the “read” command to read from the file descriptor 3.
Finally, on line 13 we are closing the file descriptor 3.
When you execute the previous script you will have the following output in your terminal window.
$ ./io-redirections-0011.sh
LINE_CONTENT[0]: Lorem ipsum dolor sit amet, consectetur adipiscing elit.
LINE_CONTENT[1]: Duis varius urna erat, a facilisis mauris vehicula at.
LINE_CONTENT[2]: Phasellus imperdiet tristique mauris sit amet posuere.
LINE_CONTENT[3]: Duis molestie, purus vel sodales posuere, leo dolor tempor odio,
LINE_CONTENT[4]: vel imperdiet quam orci vel diam. Curabitur finibus dapibus gravida.
LINE_CONTENT[5]: Duis gravida iaculis condimentum.
LINE_CONTENT[6]: Sed ultricies nulla luctus, sollicitudin velit quis, maximus arcu.
LINE_CONTENT[7]: Morbi lacinia luctus urna, nec suscipit felis consequat eget.
LINE_CONTENT[8]: Vestibulum nec sodales magna, nec placerat velit.
LINE_CONTENT[9]: Mauris volutpat tellus neque, quis bibendum magna tincidunt a.
LINE_CONTENT[10]: Maecenas faucibus scelerisque enim sollicitudin molestie.
LINE_CONTENT[11]: Nunc mauris nibh, semper sit amet tellus eu, auctor egestas erat.
LINE_CONTENT[12]: Nunc non pharetra diam. Praesent nec luctus metus.
LINE_CONTENT[13]: Pellentesque in turpis nulla.
LINE_CONTENT[14]: Mauris vehicula consequat nisl, et elementum nunc dictum at.
LINE_CONTENT[15]: Sed fringilla luctus tincidunt.
Appending to an existing file
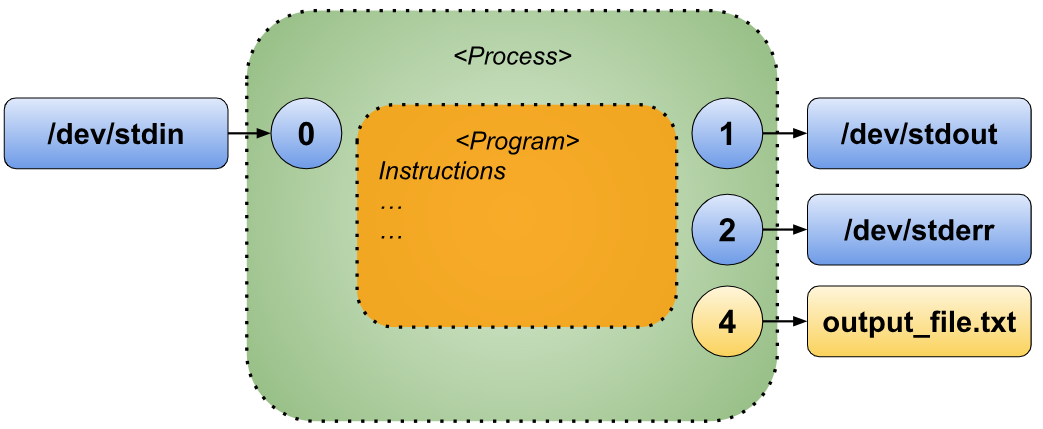
If we want to redirect output to an existing file and append new content rather than overwriting it, we can use an append redirection. This can be done by connecting a file descriptor (in this case, File Descriptor 4) to a file named “output_file.txt”. The script we create will ensure that each line it generates is appended to “output_file.txt”, preserving any existing content in the file.
 1 #!/usr/bin/env bash
 2 #Script: io-redirections-0012.sh
 3 # Redirect FD 4. Appending it to file
 4 exec 4>>output_file.txt
 5 # Printing to the output file
 6 for i in {1..5}; do
 7     # Print line to FD 4
 8     printf "Line_$i\n" >&4
 9 done
10 printf "#######\n" >&4
11 # Close file descriptor
12 exec 4>&-
In the “io-redirections-0012.sh” script, File Descriptor 4 is connected to the file “output_file.txt” on line 4. From lines 6 to 10, the script appends multiple lines to “output_file.txt”. Notice line 8, where the “>&4” redirection is used to send a line of output specifically to File Descriptor 4. Finally, on line 12, File Descriptor 4 is closed to release the associated file.
If you execute the script multiple times and print the content of the file “output_file.txt” you will see something like the following in your terminal window.
$ ./io-redirections-0012.sh

$ ./io-redirections-0012.sh

$ cat output_file.txt
Line_1
Line_2
Line_3
Line_4
Line_5
#######
Line_1
Line_2
Line_3
Line_4
Line_5
#######
With each execution of the script, additional lines are appended to the file “output_file.txt”.
Duplicating file descriptors
In one of the examples, we explored how to redirect both standard output and standard error to the same file. One way to achieve this was with the following command.
exec >output.txt 2>&1
In this section, we will focus on the last part of this redirection, specifically 2>&1.
The meaning of “2>&1” can be understood in two (equivalent) ways:
-
Simplistic Explanation: It can be interpreted as, “Whatever is sent to file descriptor 2 (standard error) is redirected to file descriptor 1 (standard output).” This assumes the syntax is “
source>&target”, where data from the “source” file descriptor is redirected to the “target”. While this explanation is useful for basic understanding, it is not entirely precise. -
More Accurate Explanation: A more accurate way to describe it is, “Copy the destination of file descriptor 1 (standard output) to file descriptor 2 (standard error).” This reflects the actual syntax of the redirection as “
target>&source”, which means, “Copy the destination of thesourcedescriptor into thetargetdescriptor.”
For example, the command “exec >output.txt 2>&1” can be visualized graphically to illustrate how both outputs are unified into the file “output.txt”.
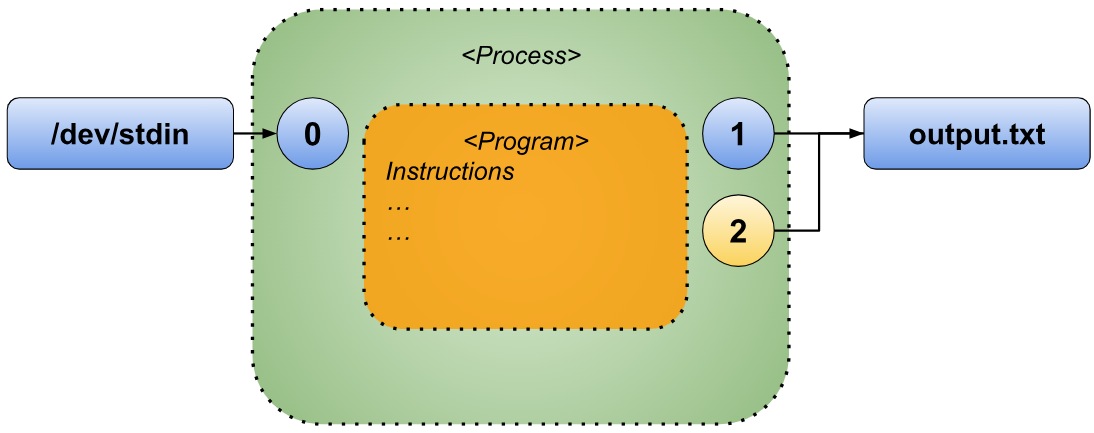
Order of redirections
At the start of this chapter, we discussed that Bash processes redirections from left to right, meaning the order of redirections is crucial.
To illustrate this concept, let’s compare two simple redirection examples:
- “
exec >output 2>&1” - “
exec 2>&1 >output”
What is the difference between these two commands? In the following subsections, we will break down each redirection step by step, just as Bash interprets them, to clarify their distinct behaviors.
Redirection exec >output 2>&1

Before the “exec” built-in command is executed, the state of the file descriptors is as shown in the preceding illustration.
The first redirection, “>output”, is processed. This redirection reassigns the standard output to the file named “output”, resulting in the following configuration.
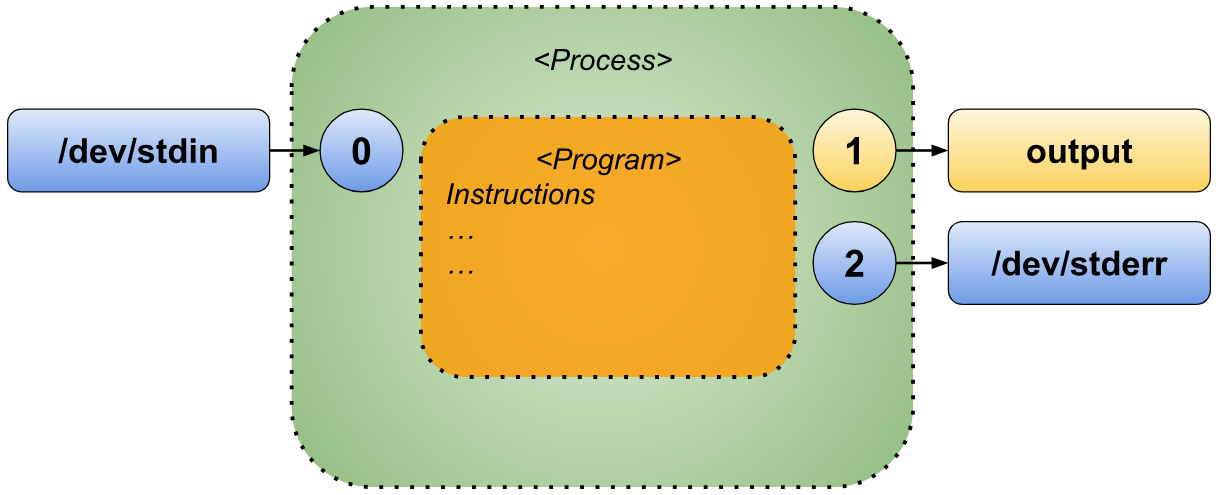
Once the first redirection has been successfully processed, Bash proceeds to interpret the next one.
The second redirection, “2>&1”, instructs Bash to “Copy the destination currently assigned to file descriptor 1 (standard output) to file descriptor 2 (standard error).” This results in the following effect.
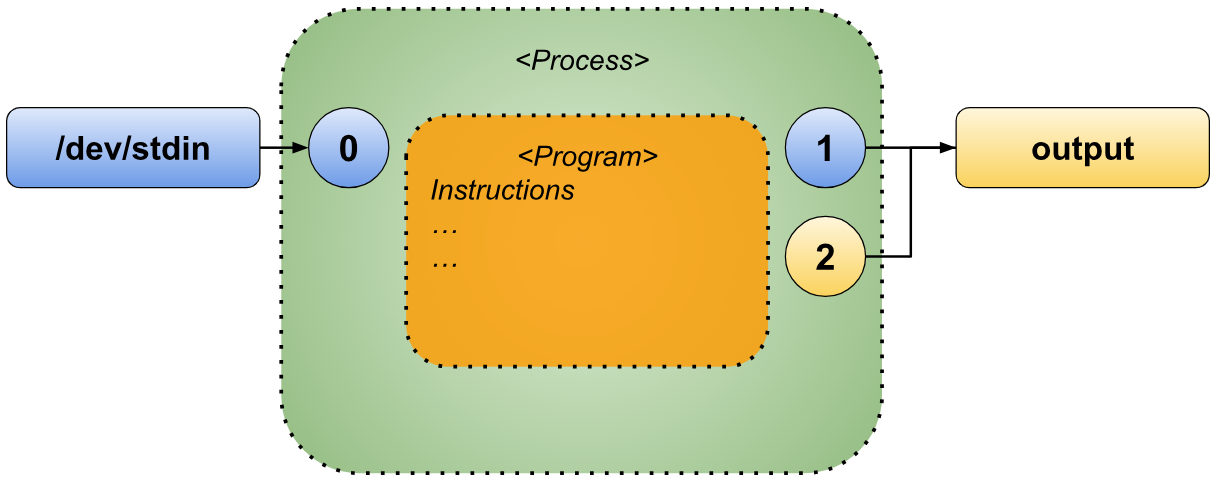
In this sequence of redirections, the script is configured to direct both standard output and standard error to the file named “output”.
Redirection exec 2>&1 >output
Let’s see what happens when we reverse the order of the redirections.

The script starts with the same initial state, where the default file descriptors are assigned to their standard destinations.
The first redirection, “2>&1”, “copies the destination currently assigned to file descriptor 1 (standard output) to file descriptor 2 (standard error),” resulting in the following effect.
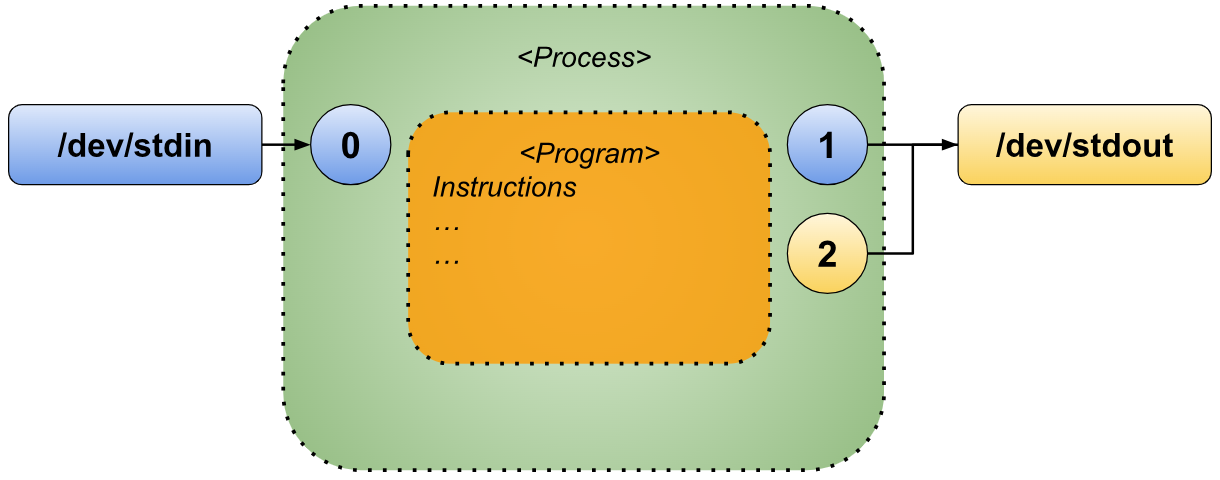
At this point, both the standard output and standard error file descriptors are directed to the original standard output.
The second redirection, “>output”, then reassigns the standard output to the file output. This change can be visually represented as follows.
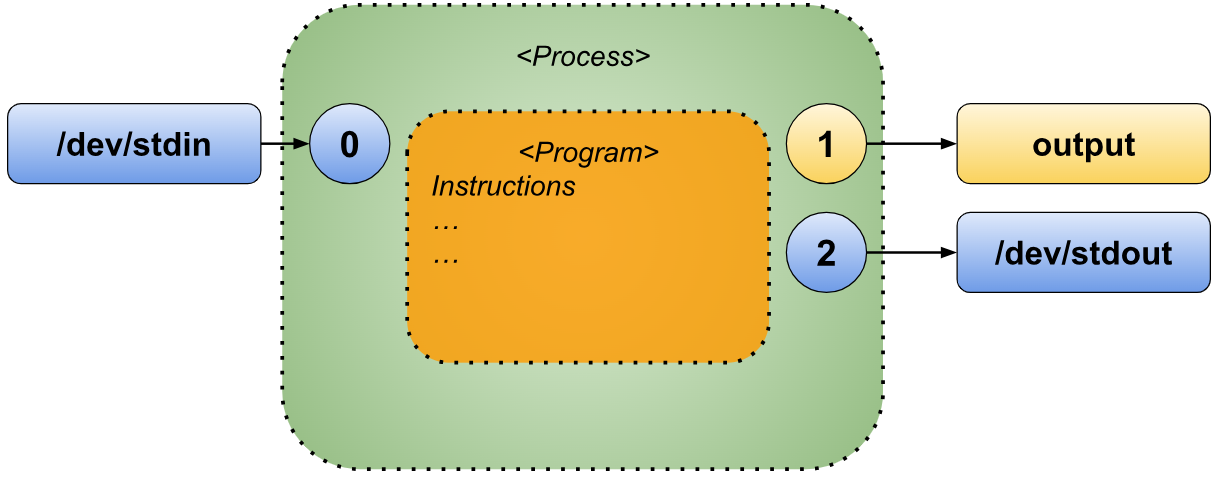
As a result of processing the second redirection, standard error remains directed to the original standard output (“/dev/stdout”), while standard output is now redirected to the file named “output”.
Pipes (|)
Up to this point, we have focused on using Bash commands independently, executing one at a time. We also explored the “find” command, which includes the “-exec” option to apply additional commands to its results. However, not all commands provide such a feature.
Fortunately, Bash allows commands to be chained or linked together using the pipe (“|”) metacharacter.
The pipe (“|”) serves as a tool for connecting commands, enabling them to communicate with each other. Its usage can be represented as:
command1 | command2 | command3 | …
This syntax works by linking:
- The standard output of “
command1” to the standard input of “command2”. - The standard output of “
command2” to the standard input of “command3”. - The standard output of “
command3” to the standard input of the following command. - And so on.
The flow of data through this chain can be illustrated graphically as follows.

Let’s explore an example using some familiar commands, such as “cat” and “grep”.
cat <somefile> | grep --color <my term to find>
Or with “ls” and “cat”.
ls -la | cat --color <partial_filename>
As demonstrated, pipes allow us to seamlessly chain commands together. This raises an intriguing question: can we pipe into something that isn’t a command in the traditional sense? Let’s dive deeper to find out!
Pipeable functions
From a technical perspective, a pipe (“|”) connects the Standard Output (File Descriptor 1) of the command on the left to the Standard Input (File Descriptor 0) of the command on the right.
This implies that any function or script capable of reading from Standard Input and writing to Standard Output should, in theory, work seamlessly in a chain of commands. Let’s test this concept with an example.
 1 #!/usr/bin/env bash
 2 #Script: io-redirections-0013.sh
 3 myFunction() {
 4     local INPUT=()
 5     local index=0
 6     local IFS=$'\n'
 7     # Read from standard input
 8     while read -r MY_INPUT; do
 9         INPUT[$index]="$MY_INPUT"
10         index=$(($index+1))
11     done
12     # Echo to standard output
13     for item in ${INPUT[@]}; do
14         local length=${#item}
15         echo "ITEM[$item]: $length"
16     done
17 }
18 # Piping "ls" command to "myFunction"
19 ls -l | myFunction
This script performs two main steps. First, it reads all input from the Standard Input and stores each line as an individual element in an array named “INPUT”. Next, it iterates through the array, printing each line to the Standard Output in the format: “ITEM[<line>]: <line_length>”.
When you execute the previous script you will a result similar to the following.
$ ./io-redirections-0013.sh
ITEM[total 60]: 8
ITEM[-rwxrwxr-x 1 username username 242 Nov 19 06:38 io-redirections-0001.sh]: 77
ITEM[-rwxrwxr-x 1 username username 527 Nov 20 05:38 io-redirections-0002.sh]: 77
ITEM[-rwxrwxr-x 1 username username 604 Nov 21 06:27 io-redirections-0003.sh]: 77
ITEM[-rwxrwxr-x 1 username username 454 Nov 21 07:10 io-redirections-0004.sh]: 77
ITEM[-rwxrwxr-x 1 username username 433 Nov 21 07:19 io-redirections-0005.sh]: 77
ITEM[-rwxrwxr-x 1 username username 216 Nov 22 05:33 io-redirections-0006.sh]: 77
ITEM[-rwxrwxr-x 1 username username 274 Nov 23 08:35 io-redirections-0007.sh]: 77
ITEM[-rwxrwxr-x 1 username username 231 Nov 24 09:09 io-redirections-0008.sh]: 77
ITEM[-rwxrwxr-x 1 username username 225 Nov 25 05:29 io-redirections-0009.sh]: 77
ITEM[-rwxrwxr-x 1 username username 384 Nov 25 06:09 io-redirections-0010.sh]: 77
ITEM[-rwxrwxr-x 1 username username 281 Nov 25 07:01 io-redirections-0011.sh]: 77
ITEM[-rwxrwxr-x 1 username username 279 Nov 25 14:34 io-redirections-0012.sh]: 77
ITEM[-rwxrwxr-x 1 username username 452 Nov 26 07:00 io-redirections-0013.sh]: 77
ITEM[-rwxrwxr-x 1 username username 587 Nov 27 05:42 io-redirections-0014.sh]: 77
ITEM[-rw-rw-r-- 1 username username 890 Nov 25 06:50 lorem.txt]: 63
PIPESTATUS
When working with pipes, it’s often helpful to determine the exit status of the commands that were executed. For this, Bash provides the internal array variable PIPESTATUS. This variable is transient and must be accessed immediately after the execution of the pipe sequence, as any subsequent command will overwrite it.
Consider the following command.
command1 | command2 | command3 | command4
Once this series of piped commands completes, the PIPESTATUS array will store the exit status of each command in the same order they were executed.
| Item of PIPESTATUS | Description |
|---|---|
PIPESTATUS[0] |
Exit status for “command1” |
PIPESTATUS[1] |
Exit status for “command2” |
PIPESTATUS[2] |
Exit status for “command3” |
PIPESTATUS[3] |
Exit status for “command4” |
Let’s write an example script to play with the array “PIPESTATUS”.
 1 #!/usr/bin/env bash
 2 #Script: io-redirections-0014.sh
 3 myFunction() {
 4     local INPUT=()
 5     local index=0
 6     local IFS=$'\n'
 7     # Read from standard input
 8     while read -r MY_INPUT; do
 9         INPUT[$index]="$MY_INPUT"
10         index=$(($index+1))
11     done
12     # Echo to standard output
13     for item in ${INPUT[@]}; do
14         local length=${#item}
15         echo "ITEM[$item]: $length"
16     done
17 }
18 # Piping "ls -l" command to "grep" command
19 # Piping "grep" command to "myFunction"
20 ls -l | grep ".txt" | myFunction
21 # Echoing the full array of PIPESTATUS
22 echo "PIPESTATUS: ${PIPESTATUS[@]}"
The previous “io-redirections-0014.sh” script is very similar to the script “io-redirections-0013.sh.
When you execute the previous script you will a similar output in your terminal window.
$ ./io-redirections-0014.sh
ITEM[-rw-rw-r-- 1 username username 890 Nov 25 06:50 lorem.txt]: 63
PIPESTATUS: 0 0 0
The output shows only the entry for the file “lorem.txt” followed by the line.
PIPESTATUS: 0 0 0
This line indicates that all the commands in the pipeline executed successfully. Specifically:
- The first “
0” means the “ls -l” command succeeded. - The second “
0” confirms that the “grep ".txt"” command also succeeded. - The third “
0” reflects the success of the “myFunction” execution.
If any of these commands had failed, its corresponding value in the “PIPESTATUS” array would have been a non-zero number instead of “0”.
This script performs the following steps:
- Lists the contents of the current folder using the “
ls” command. - Redirects the standard output of “
ls” to the standard input of the “grep” command. - Filters lines containing “
.txt” using “grep”, which reads from its standard input and outputs only the matching lines. - Passes the filtered lines to “
myFunction”, which processes each line from its standard input and outputs it in a custom format. - Displays the exit status of each command in the pipeline using the “
PIPESTATUS” array on the final line of the script.
tee command
The “tee” command is an incredibly versatile tool for managing redirections. Its name is derived from its functionality, which resembles the shape of the letter “T”.
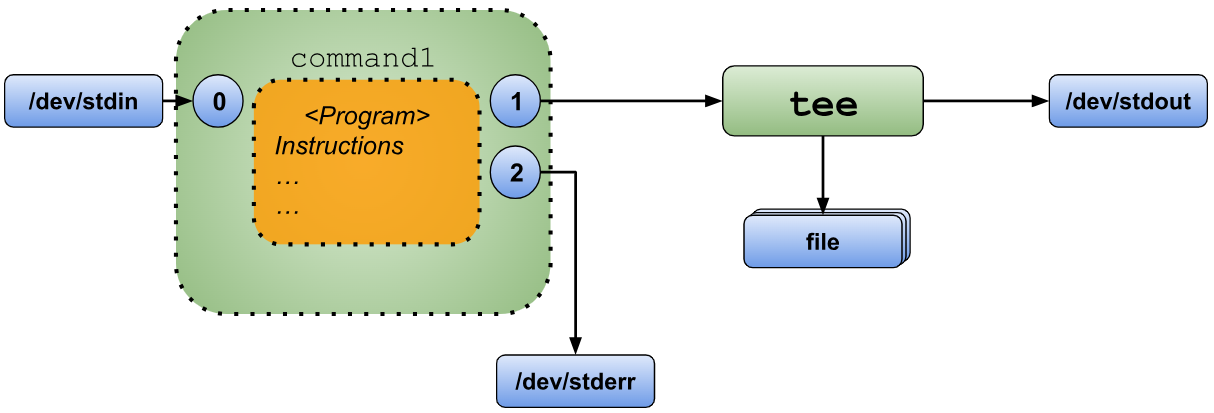
The “tee” command reads data from its standard input and simultaneously writes it to both its standard output and any file(s) specified as arguments. This allows you to redirect the same data to multiple files, scripts, or commands all at once.
Let’s re-use the “io-redirections-0011.sh” script with the “tee” command.
$ ./io-redirections-0011.sh | tee /tmp/output1.txt /tmp/output2.txt
LINE_CONTENT[0]: Lorem ipsum dolor sit amet, consectetur adipiscing elit.
LINE_CONTENT[1]: Duis varius urna erat, a facilisis mauris vehicula at.
LINE_CONTENT[2]: Phasellus imperdiet tristique mauris sit amet posuere.
LINE_CONTENT[3]: Duis molestie, purus vel sodales posuere, leo dolor tempor odio,
LINE_CONTENT[4]: vel imperdiet quam orci vel diam. Curabitur finibus dapibus gravida.
LINE_CONTENT[5]: Duis gravida iaculis condimentum.
LINE_CONTENT[6]: Sed ultricies nulla luctus, sollicitudin velit quis, maximus arcu.
LINE_CONTENT[7]: Morbi lacinia luctus urna, nec suscipit felis consequat eget.
LINE_CONTENT[8]: Vestibulum nec sodales magna, nec placerat velit.
LINE_CONTENT[9]: Mauris volutpat tellus neque, quis bibendum magna tincidunt a.
LINE_CONTENT[10]: Maecenas faucibus scelerisque enim sollicitudin molestie.
LINE_CONTENT[11]: Nunc mauris nibh, semper sit amet tellus eu, auctor egestas erat.
LINE_CONTENT[12]: Nunc non pharetra diam. Praesent nec luctus metus.
LINE_CONTENT[13]: Pellentesque in turpis nulla.
LINE_CONTENT[14]: Mauris vehicula consequat nisl, et elementum nunc dictum at.
LINE_CONTENT[15]: Sed fringilla luctus tincidunt.

$ cat /tmp/output1.txt
LINE_CONTENT[0]: Lorem ipsum dolor sit amet, consectetur adipiscing elit.
LINE_CONTENT[1]: Duis varius urna erat, a facilisis mauris vehicula at.
LINE_CONTENT[2]: Phasellus imperdiet tristique mauris sit amet posuere.
LINE_CONTENT[3]: Duis molestie, purus vel sodales posuere, leo dolor tempor odio,
LINE_CONTENT[4]: vel imperdiet quam orci vel diam. Curabitur finibus dapibus gravida.
LINE_CONTENT[5]: Duis gravida iaculis condimentum.
LINE_CONTENT[6]: Sed ultricies nulla luctus, sollicitudin velit quis, maximus arcu.
LINE_CONTENT[7]: Morbi lacinia luctus urna, nec suscipit felis consequat eget.
LINE_CONTENT[8]: Vestibulum nec sodales magna, nec placerat velit.
LINE_CONTENT[9]: Mauris volutpat tellus neque, quis bibendum magna tincidunt a.
LINE_CONTENT[10]: Maecenas faucibus scelerisque enim sollicitudin molestie.
LINE_CONTENT[11]: Nunc mauris nibh, semper sit amet tellus eu, auctor egestas erat.
LINE_CONTENT[12]: Nunc non pharetra diam. Praesent nec luctus metus.
LINE_CONTENT[13]: Pellentesque in turpis nulla.
LINE_CONTENT[14]: Mauris vehicula consequat nisl, et elementum nunc dictum at.
LINE_CONTENT[15]: Sed fringilla luctus tincidunt.

$ cat /tmp/output2.txt
LINE_CONTENT[0]: Lorem ipsum dolor sit amet, consectetur adipiscing elit.
LINE_CONTENT[1]: Duis varius urna erat, a facilisis mauris vehicula at.
LINE_CONTENT[2]: Phasellus imperdiet tristique mauris sit amet posuere.
LINE_CONTENT[3]: Duis molestie, purus vel sodales posuere, leo dolor tempor odio,
LINE_CONTENT[4]: vel imperdiet quam orci vel diam. Curabitur finibus dapibus gravida.
LINE_CONTENT[5]: Duis gravida iaculis condimentum.
LINE_CONTENT[6]: Sed ultricies nulla luctus, sollicitudin velit quis, maximus arcu.
LINE_CONTENT[7]: Morbi lacinia luctus urna, nec suscipit felis consequat eget.
LINE_CONTENT[8]: Vestibulum nec sodales magna, nec placerat velit.
LINE_CONTENT[9]: Mauris volutpat tellus neque, quis bibendum magna tincidunt a.
LINE_CONTENT[10]: Maecenas faucibus scelerisque enim sollicitudin molestie.
LINE_CONTENT[11]: Nunc mauris nibh, semper sit amet tellus eu, auctor egestas erat.
LINE_CONTENT[12]: Nunc non pharetra diam. Praesent nec luctus metus.
LINE_CONTENT[13]: Pellentesque in turpis nulla.
LINE_CONTENT[14]: Mauris vehicula consequat nisl, et elementum nunc dictum at.
LINE_CONTENT[15]: Sed fringilla luctus tincidunt.
At first glance, the output appears identical to what we observed earlier, even without using the tee command. So, what’s the real benefit? If you inspect the “/tmp” directory, you’ll find two newly created files: “/tmp/output1.txt” and “/tmp/output2.txt”. Upon examining their contents using the “cat” command or a text editor, you’ll notice that both files contain exactly the same output that was displayed during the execution of the command.
Combining Pipes and Redirections
Up to this point, we’ve explored redirections and pipes (“|”) as separate concepts. Redirections enable us to manipulate file descriptors, allowing data to be read from or written to files. Pipes, on the other hand, facilitate the direct connection of a command’s output to the input of another command.
By combining these two concepts, we can redirect multiple outputs from one command and feed them into the standard input of the next command, creating powerful and flexible workflows.
To demonstrate this, we’ll create a simple script that reads data from its standard input and outputs it in a formatted style to its standard output.
 1 #!/usr/bin/env bash
 2 #Script: io-redirections-0015.sh
 3 # Reading from Standard Input
 4 while read -r INPUT_LINE; do
 5     printf "Line content: \"$INPUT_LINE\"\n"
 6 done
Then we are going to use the “ls” command to print the contents of a file that does not exist and a folder that does exist.
$ ls /tmp/no_bueno /tmp
ls: cannot access '/tmp/no_bueno': No such file or directory
/tmp:
combined_log.txt
error_log.txt
gdm3-config-err-rLRc3P
hsperfdata_chemacabeza
kotlin-idea-4047041896916890883-is-running
output1.txt
output2.txt
output_log.txt
pulse-PKdhtXMmr18n
qtsingleapp-FoxitR-e4d5-3e8
qtsingleapp-FoxitR-e4d5-3e8-lockfile
result.csv
snap-private-tmp
v8-compile-cache-1000
vxr8svt
As you can see from the previous output, it first prints the errors (in our case indicating that the file/folder “/tmp/no_bueno” does not exist) and then the correct output.
What would happen if we would pipe the previous command to our “io-redirections-0015.sh” script? Let’s find out!
$ ls /tmp/no_bueno /tmp | ./io-redirections-0015.sh
ls: cannot access '/tmp/no_bueno': No such file or directory
Line content: "/tmp:"
Line content: "combined_log.txt"
Line content: "error_log.txt"
Line content: "gdm3-config-err-rLRc3P"
Line content: "hsperfdata_chemacabeza"
Line content: "kotlin-idea-4047041896916890883-is-running"
Line content: "output1.txt"
Line content: "output2.txt"
Line content: "output_log.txt"
Line content: "pulse-PKdhtXMmr18n"
Line content: "qtsingleapp-FoxitR-e4d5-3e8"
Line content: "qtsingleapp-FoxitR-e4d5-3e8-lockfile"
Line content: "result.csv"
Line content: "snap-private-tmp"
Line content: "v8-compile-cache-1000"
Line content: "vxr8svt"
In this case you can see that the error from the “ls” command it’s still printed to the standard error and not redirected to the standard input of our script. We could visualize this situation as follows.
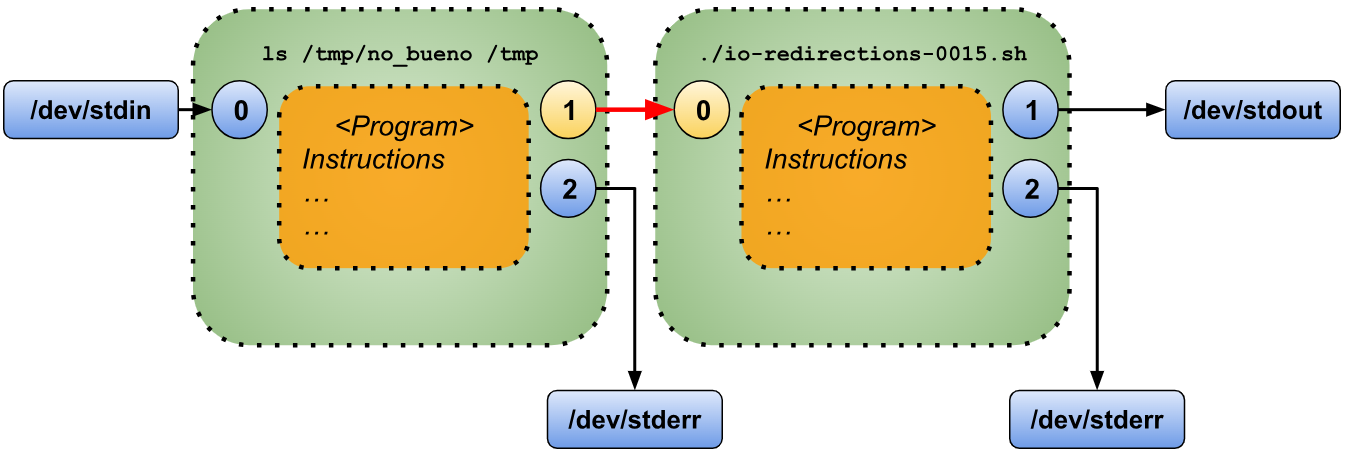
In order to be able to redirect the standard error from “ls” to the standard input of “io-redirections-0015.sh” we need to add “2>&1” to our “ls” command (“Copy the destination pointed by file descriptor 1 to file descriptor 2”). The effect of adding that redirection before the pipe (“|”) can be visualized as follows.
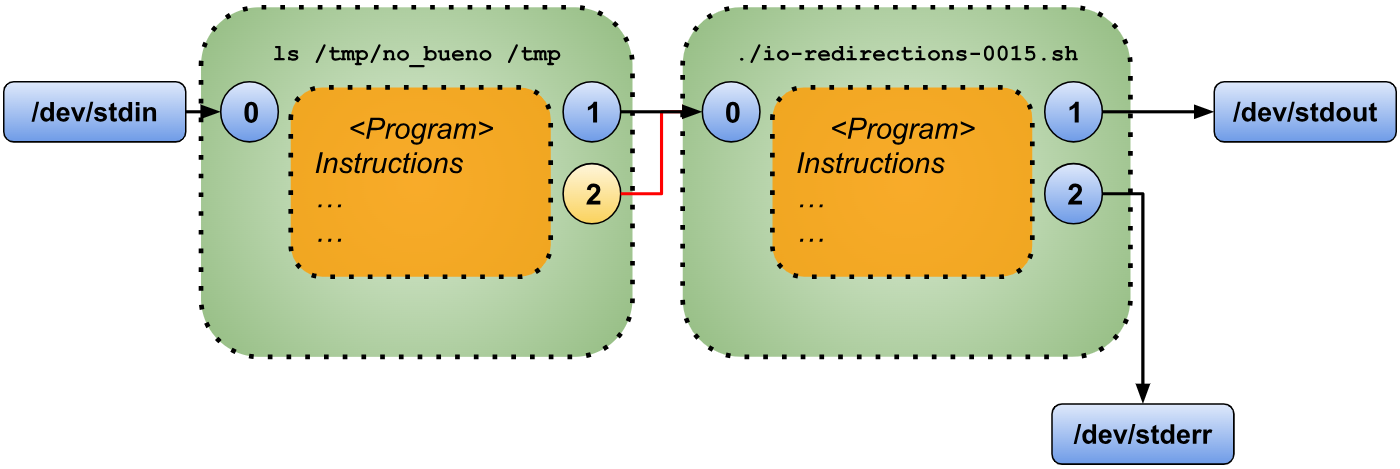
$ ls /tmp/no_bueno /tmp 2>&1 | ./io-redirections-0015.sh
Line content: "ls: cannot access '/tmp/no_bueno': No such file or directory"
Line content: "/tmp:"
Line content: "combined_log.txt"
Line content: "error_log.txt"
Line content: "gdm3-config-err-rLRc3P"
Line content: "hsperfdata_chemacabeza"
Line content: "kotlin-idea-4047041896916890883-is-running"
Line content: "output1.txt"
Line content: "output2.txt"
Line content: "output_log.txt"
Line content: "pulse-PKdhtXMmr18n"
Line content: "qtsingleapp-FoxitR-e4d5-3e8"
Line content: "qtsingleapp-FoxitR-e4d5-3e8-lockfile"
Line content: "result.csv"
Line content: "snap-private-tmp"
Line content: "v8-compile-cache-1000"
Line content: "vxr8svt"
You can get the same effect as the previous example when using “|&” as pipe.
$ ls /tmp/no_bueno /tmp |& ./io-redirections-0015.sh
Line content: "ls: cannot access '/tmp/no_bueno': No such file or directory"
Line content: "/tmp:"
Line content: "combined_log.txt"
Line content: "error_log.txt"
Line content: "gdm3-config-err-rLRc3P"
Line content: "hsperfdata_chemacabeza"
Line content: "kotlin-idea-4047041896916890883-is-running"
Line content: "output1.txt"
Line content: "output2.txt"
Line content: "output_log.txt"
Line content: "pulse-PKdhtXMmr18n"
Line content: "qtsingleapp-FoxitR-e4d5-3e8"
Line content: "qtsingleapp-FoxitR-e4d5-3e8-lockfile"
Line content: "result.csv"
Line content: "snap-private-tmp"
Line content: "v8-compile-cache-1000"
Line content: "vxr8svt"
Where to place the redirections?
Up to this point, we have been placing redirections at the end of commands, which is considered good practice. However, redirections can actually be positioned anywhere within a command invocation.
For instance, the following examples would produce the exact same output as demonstrated in the previous section.
$ ls /tmp/no_bueno /tmp 2>&1 | ./io-redirections-0015.sh # Original
$ ls /tmp/no_bueno 2>&1 /tmp | ./io-redirections-0015.sh
$ ls 2>&1 /tmp/no_bueno /tmp | ./io-redirections-0015.sh
$ 2>&1 ls /tmp/no_bueno /tmp | ./io-redirections-0015.sh
You might assume that redirections are simply additional arguments passed to the command, but this is not the case. In fact, the script being executed is completely unaware of the redirections—they are handled by the shell itself. To illustrate this, we’ll test a script that processes and displays the arguments passed as input.
 1 #!/usr/bin/env bash
 2 #Script: io-redirections-0016.sh
 3 INPUT_ARGS=($@)
 4 echo "Number of arguments: ${#INPUT_ARGS[@]}"
 5 declare -i position=0
 6 for arg in ${INPUT_ARGS[@]}; do
 7     echo "Argument[$position]: $arg"
 8     ((position++))
 9 done
The previous “io-redirections-0016.sh” script is only showing the different arguments passed. We are going to use this script to show that redirections are not arguments for the script.
$ ./io-redirections-0016.sh
Number of arguments: 0

$ ./io-redirections-0016.sh arg1 arg2 arg3
Number of arguments: 3
Argument[0]: arg1
Argument[1]: arg2
Argument[2]: arg3

$ ./io-redirections-0016.sh arg1 2>&1 arg2 arg3
Number of arguments: 3
Argument[0]: arg1
Argument[1]: arg2
Argument[2]: arg3
The result remains the same as before. Why is that? As explained earlier in this chapter, Bash processes redirections to configure the file descriptors as required. Once Bash interprets and applies these redirections, they are removed from the command line. This explains why our last script could not display them.
Block Redirections
In the Block Statements chapter, we explored how commands can be grouped using curly braces (“{ ... }”), allowing the logic contained within to execute as a single unit.
These grouped blocks can also be modified using the redirection techniques we covered in this section.
For instance, suppose we have a file named “input_file” with the following content.
Line_1
Line_2
Line_3
Line_4
Line_5
Line_6
Line_7
Line_8
Line_9
Line_10
We are going to write a script where we will be assigning redirections to a block statement.
 1 #!/usr/bin/env bash
 2 #Script: io-redirections-0017.sh
 3 INPUT_FILE=input_file
 4 OUTPUT_FILE=/tmp/output.txt
 5 echo "Block reading from '$INPUT_FILE'"
 6 {
 7     while read line; do
 8         echo "Line read: '$line'"
 9     done
10 } <$INPUT_FILE >$OUTPUT_FILE # <<<<<< Redirections
11 echo "End of program"
As you will notice on line 10 we are specifying a redirection for Standard Input to read from the file “input_file” and another redirection for the Standard Output to print the information to the file “/tmp/output.txt”.
Statement Redirections
Just as we saw in the previous section, where we explored redirecting input and output for code blocks enclosed in curly braces, this section focuses on applying redirections to specific statements, including:
- “
while” loops - “
until” loops - “
for” loops - “
if/else” statements
Similar to block redirections, the redirections for these statements are placed immediately after the statement itself. In the following subsections, we will explore examples for each, using the same input_file from the previous section as our reference.
“while” loop redirection
Just as we applied redirections immediately after a code block enclosed in curly braces, we follow the same approach for a “while” loop. In this case, the redirections are placed directly after the “done” keyword that concludes the loop.
Let’s see the following example.
 1 #!/usr/bin/env bash
 2 #Script: io-redirections-0018.sh
 3 INPUT_FILE=input_file
 4 OUTPUT_FILE=/tmp/output.txt
 5 while read line; do
 6 		echo "[while] LINE READ WAS '$line'"
 7 done <$INPUT_FILE >$OUTPUT_FILE
 8 #   ^^^          ^^^
When you execute the previous script and print the contents of the “/tmp/output.txt” file you will see something like the following in your terminal window.
$ ./io-redirections-0018.sh

$ cat /tmp/output.txt
[while] LINE READ WAS 'Line_1'
[while] LINE READ WAS 'Line_2'
[while] LINE READ WAS 'Line_3'
[while] LINE READ WAS 'Line_4'
[while] LINE READ WAS 'Line_5'
[while] LINE READ WAS 'Line_6'
[while] LINE READ WAS 'Line_7'
[while] LINE READ WAS 'Line_8'
[while] LINE READ WAS 'Line_9'
[while] LINE READ WAS 'Line_10'
“until” loop redirection
Similarly to how redirections were applied after the “done” keyword in a “while” loop, the same approach is used here. The redirections are placed immediately after the done keyword.
Let’s explore how this works with the following example.
 1 #!/usr/bin/env bash
 2 #Script: io-redirections-0019.sh
 3 INPUT_FILE=input_file
 4 OUTPUT_FILE=/tmp/output.txt
 5 MY_LINE=
 6 until [ "$MY_LINE" = "Line_10" ]; do
 7     read MY_LINE
 8     echo "[until] LINE READ WAS '$MY_LINE'"
 9 done <$INPUT_FILE >$OUTPUT_FILE
10 #   ^^^          ^^^
When you execute the previous script and print the contents of the “/tmp/output.txt” file you will see something like the following in your terminal window.
$ ./io-redirections-0019.sh

$ cat /tmp/output.txt
[until] LINE READ WAS 'Line_1'
[until] LINE READ WAS 'Line_2'
[until] LINE READ WAS 'Line_3'
[until] LINE READ WAS 'Line_4'
[until] LINE READ WAS 'Line_5'
[until] LINE READ WAS 'Line_6'
[until] LINE READ WAS 'Line_7'
[until] LINE READ WAS 'Line_8'
[until] LINE READ WAS 'Line_9'
[until] LINE READ WAS 'Line_10'
“for” loop redirection
As with the other types of loops, redirections for a “for” loop are placed immediately after the “done” keyword.
Let’s illustrate this with the following example.
 1 #!/usr/bin/env bash
 2 #Script: io-redirections-0020.sh
 3 INPUT_FILE=input_file
 4 OUTPUT_FILE=/tmp/output.txt
 5 for i in {1..10}; do
 6     read MY_LINE
 7     echo "[for] LINE READ WAS '$MY_LINE'"
 8 done <$INPUT_FILE >$OUTPUT_FILE
 9 #   ^^^          ^^^
When you execute the previous script and print the contents of the “/tmp/output.txt” file you will see something like the following in your terminal window.
$ ./io-redirections-0020.sh

$ cat /tmo/output.txt
[for] LINE READ WAS 'Line_1'
[for] LINE READ WAS 'Line_2'
[for] LINE READ WAS 'Line_3'
[for] LINE READ WAS 'Line_4'
[for] LINE READ WAS 'Line_5'
[for] LINE READ WAS 'Line_6'
[for] LINE READ WAS 'Line_7'
[for] LINE READ WAS 'Line_8'
[for] LINE READ WAS 'Line_9'
[for] LINE READ WAS 'Line_10'
“if/then” redirection
In the case of “if/then” you need to put the redirections after the “fi” keyword.
Let’s see how it works with the following example.
 1 #!/usr/bin/env bash
 2 #Script: io-redirections-0021.sh
 3 INPUT_FILE=input_file
 4 OUTPUT_FILE=/tmp/output.txt
 5 if [ true ]; then
 6     while read MY_LINE; do
 7         echo "[if] LINE READ WAS '$MY_LINE'"
 8     done
 9 fi <$INPUT_FILE >$OUTPUT_FILE
10 # ^^^          ^^^
When you execute the previous script and print the contents of the “/tmp/output.txt” file you will see something like the following in your terminal window.
$ ./io-redirections-0021.sh

$ cat /tmp/output.txt
[if] LINE READ WAS 'Line_1'
[if] LINE READ WAS 'Line_2'
[if] LINE READ WAS 'Line_3'
[if] LINE READ WAS 'Line_4'
[if] LINE READ WAS 'Line_5'
[if] LINE READ WAS 'Line_6'
[if] LINE READ WAS 'Line_7'
[if] LINE READ WAS 'Line_8'
[if] LINE READ WAS 'Line_9'
[if] LINE READ WAS 'Line_10'
“if/then/else” redirection
Similar to the “if/then” statement redirection we need to add the redirections after the “fi” keyword.
Let’s see how it works with the following example.
 1 #!/usr/bin/env bash
 2 #Script: io-redirections-0022.sh
 3 INPUT_FILE=input_file
 4 OUTPUT_FILE=/tmp/output.txt
 5 if false; then
 6     read MY_LINE
 7 		echo "[if-then] LINE READ WAS '$MY_LINE'"
 8 else
 9     while read MY_LINE; do
10         echo "[else] LINE READ WAS '$MY_LINE'"
11     done
12 fi <$INPUT_FILE >$OUTPUT_FILE
13 # ^^^          ^^^
When you execute the previous script and print the contents of the “/tmp/output.txt” file you will see something like the following in your terminal window.
$ ./io-redirections-0022.sh

$ cat /tmp/output.txt
[else] LINE READ WAS 'Line_1'
[else] LINE READ WAS 'Line_2'
[else] LINE READ WAS 'Line_3'
[else] LINE READ WAS 'Line_4'
[else] LINE READ WAS 'Line_5'
[else] LINE READ WAS 'Line_6'
[else] LINE READ WAS 'Line_7'
[else] LINE READ WAS 'Line_8'
[else] LINE READ WAS 'Line_9'
[else] LINE READ WAS 'Line_10'
Pipes, Statements and Blocks
Blocks and statements, as we’ve seen, are treated similarly when it comes to redirections. This means you can modify file descriptors using the syntax we covered earlier, create pipelines by combining them in various orders, and much more.
In this section, we’ll explore a few examples of combining statements and blocks using pipes.
Let’s begin by chaining the output of a command (e.g., “ls”) with a block and a “while” loop.
Assume our folder contains the following files:
$ ls test_dir
File_3  File_5  File_6  File_C  File_d  File_j  File_K  File_l  File_s  File_t  File_v  File_w  File_x
(Here, the listed files are simple, empty text files.)
We’ll use the “ls” command to generate input for our pipeline. Next, a “while” loop in the pipeline will extract the character (number or letter) following the underscore in each filename. Finally, this output will be passed to a block that concatenates the extracted values into a single string, separated by underscores (“_”).
Here’s the code to achieve this.
 1 #!/usr/bin/env bash
 2 #Script: io-redirections-0023.sh
 3 regex="File_([0-9a-zA-Z])"
 4 ls test_dir | while read line; do
 5     if [[ $line =~ $regex ]]; then
 6         echo ${BASH_REMATCH[1]}
 7     else
 8         echo "Error"
 9     fi
10 done | {
11     RESULT="_"
12     while read line; do
13         RESULT+="${line}_"
14     done
15     echo $RESULT
16 }
When this script is executed, Bash spawns three child processes, one for each segment of the pipeline:
- Child Process #1: Executes the “
ls” command. - Child Process #2: Runs the “
while” loop. - Child Process #3: Executes the block of code.
This structure can be visually represented as follows.
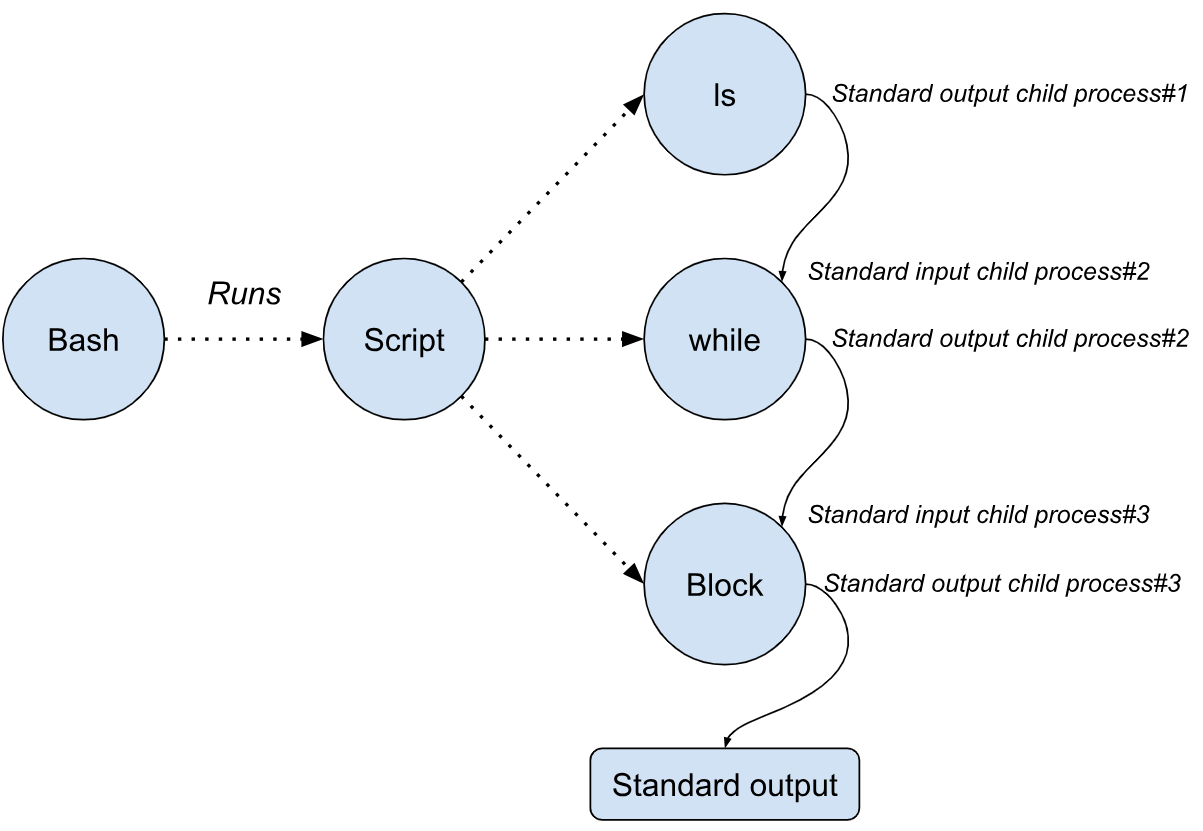
The first child process (“ls”) will produce as output the list of files of the folder and will send them to its standard output.
File_3
File_5
File_6
File_C
File_d
File_j
File_K
File_l
File_s
File_t
File_v
File_w
File_x
The second child process (“while” loop) will read from its standard input, use regular expressions to capture the character after the underscore and send the character to its standard output.
File_3 => 3
File_5 => 5
File_6 => 6
File_C => C
File_d => d
File_j => j
File_K => K
File_l => l
File_s => s
File_t => t
File_v => v
File_w => w
File_x => x
The last part of the pipeline (the block of code) will prepare the variable “RESULT”, read from its standard input appending the different characters with the variable result and, after it is done reading from its standard input, will print to its standard output the result.
_3_5_6_C_d_j_K_l_s_t_v_w_x_
When we execute the “io-redirections-0023.sh” script you will see the following in your terminal window.
$ ./io-redirections-0023.sh
_3_5_6_C_d_j_K_l_s_t_v_w_x_
This pipeline could be decomposed in 3 different scripts and could get connected using pipes.
The first script would be as follows.
 1 #!/usr/bin/env bash
 2 #Script: command_ls.sh
 3 ls test_dir
The second script would be as follows.
 1 #!/usr/bin/env bash
 2 #Script: command_while.sh
 3 regex="File_([0-9a-zA-Z])"
 4 while read line; do
 5     if [[ $line =~ $regex ]]; then
 6         echo ${BASH_REMATCH[1]}
 7     else
 8         echo "Error"
 9     fi
10 done
Finally, the third script would be as follows.
 1 #!/usr/bin/env bash
 2 #Script: command_block.sh
 3 {
 4     RESULT="_"
 5     while read line; do
 6         RESULT+="${line}_"
 7     done
 8     echo $RESULT
 9 }
When you combine the previous 3 scripts with pipes you will get the same result as script “io-redirections-0023.sh”.
$ ./command_ls.sh | ./command_while.sh | ./command_block.sh
_3_5_6_C_d_j_K_l_s_t_v_w_x_
So far, we’ve explored how to combine commands with loops, such as the “while” loop in the previous example, using pipes. However, a natural question might have already crossed your inquisitive mind: Can I achieve the same with “if/then” or “if/then/else” statements?
The answer is a resounding YES!
Let’s dive into a simple script to illustrate how this can be done with both “if/then” and “if/then/else” constructs.
 1 #!/usr/bin/env bash
 2 #Script: io-redirections-0024.sh
 3 if true; then
 4     echo "LINE 1"
 5     echo "LINE 2"
 6 fi | while read line; do
 7    echo "Line read is '$line'"
 8 done
 9 echo "HOLA" | if [[ "$(read line; echo $line)" == "HOLO" ]]; then
10     echo "OK"
11 else
12     echo "KO"
13 fi
The first example is found between lines 3 and 8. This section of code can be understood by dividing it into two parts, separated by the pipe (“|”). Before the pipe, there is an “if-then” statement that outputs two messages to its standard output. After the pipe, a loop processes this input, reading from its standard input and printing to its standard output.
The second example is located between lines 9 and 13. Similar to the first example, it can also be divided into two parts, using the pipe as a boundary. Before the pipe, a simple “echo” command prints the message “HOLA”. After the pipe, an “if-then-else” statement reads input via command substitution (“read line”) and writes the result to the standard output (“echo $line”).
In line 9, the first part of the pipeline outputs “HOLA”, which is sent as input to the second part of the pipeline. Here, the “if-then-else” statement compares the input (“HOLA”) to “HOLO”. Since this comparison fails, the output will be “KO”.
When you execute the previous “io-redirections-0024.sh” script you will see the following result in your terminal window.
$ ./io-redirections-0024.sh
Line read is 'LINE 1'
Line read is 'LINE 2'
KO
FIFO files
In the previous section, we explored text processing commands and used pipes (“|”) to pass the output of one command to the input of another. These are called “Anonymous Pipes.” They are termed “anonymous” because they are created dynamically during execution and are discarded immediately after use.
In this section, we will delve into “Named Pipes,” also known as FIFO (First In, First Out) files. A FIFO file is a special type of file that functions similarly to an Anonymous Pipe but is given a name within the file system, making it persistent and recognizable.
There are two key distinctions between Anonymous Pipes and FIFO files:
- Direction of Communication: Anonymous Pipes support unidirectional communication, where data flows exclusively from the standard output of the command on the left of the pipe (“
|”) to the standard input of the command on the right. In contrast, FIFO files allow bidirectional communication (also known as “full duplex”), enabling data to flow in both directions between programs, commands, or processes. - Scope of Usage: Anonymous Pipes are restricted to the commands they directly connect and cannot be accessed by other processes. FIFO files, however, can be shared and accessed by any process, command, or program that knows the name of the pipe.
In the following subsections, we will learn how to create FIFO files and explore their usage. Let’s dive in!
How to create a FIFO file?
In Bash, there are two commands you can use to create a FIFO file (or Named Pipe):
- “
mknod”: This command is used to create various types of special files, including block, character, or FIFO files. However, since it is a more generic tool, we will not use it for creating FIFO files in this context. Instead, we will focus on the next command. - “
mkfifo”: This command is specifically designed for creating Named Pipes. It accepts one or more file names as arguments and generates FIFO files with the specified names in the current directory.
We will use “mkfifo” for creating Named Pipes because it is straightforward and purpose-built for this task.
Let’s how it works with the following example in your terminal window.
$ mkfifo MY_FIFO

$ ls -l MY_FIFO
prw-rw-r-- 1 username 0 Dec  2 05:27 MY_FIFO
When listing the file using “ls -l”, you’ll notice that the first character in the file permissions is “p”. This indicates that the file, “MY_FIFO”, is a special type of file categorized as a “Pipe.” We’ll use the “MY_FIFO” file to experiment with Named Pipes.
How to use a FIFO file?
Using a FIFO file involves either writing data to it or reading data from it. Let’s explore this by revisiting an earlier example.
$ cat lorem.txt | tr 'a-zA-Z' 'A-Za-z'
lOREM IPSUM DOLOR SIT AMET, CONSECTETUR ADIPISCING ELIT.
dUIS VARIUS URNA ERAT, A FACILISIS MAURIS VEHICULA AT.
pHASELLUS IMPERDIET TRISTIQUE MAURIS SIT AMET POSUERE.
dUIS MOLESTIE, PURUS VEL SODALES POSUERE, LEO DOLOR TEMPOR ODIO,
VEL IMPERDIET QUAM ORCI VEL DIAM. cURABITUR FINIBUS DAPIBUS GRAVIDA.
dUIS GRAVIDA IACULIS CONDIMENTUM.
sED ULTRICIES NULLA LUCTUS, SOLLICITUDIN VELIT QUIS, MAXIMUS ARCU.
mORBI LACINIA LUCTUS URNA, NEC SUSCIPIT FELIS CONSEQUAT EGET.
vESTIBULUM NEC SODALES MAGNA, NEC PLACERAT VELIT.
mAURIS VOLUTPAT TELLUS NEQUE, QUIS BIBENDUM MAGNA TINCIDUNT A.
mAECENAS FAUCIBUS SCELERISQUE ENIM SOLLICITUDIN MOLESTIE.
nUNC MAURIS NIBH, SEMPER SIT AMET TELLUS EU, AUCTOR EGESTAS ERAT.
nUNC NON PHARETRA DIAM. pRAESENT NEC LUCTUS METUS.
pELLENTESQUE IN TURPIS NULLA.
mAURIS VEHICULA CONSEQUAT NISL, ET ELEMENTUM NUNC DICTUM AT.
sED FRINGILLA LUCTUS TINCIDUNT.
In this example, the command transforms lowercase letters into uppercase and vice versa.
To achieve the same result using the “MY_FIFO” file, we will split the single command into two separate operations. The first will write the contents of “lorem.txt” to the named pipe, while the second will read from the pipe and perform the character transliteration.
For this exercise, we will use two terminals. In the first terminal, we’ll focus on writing to the pipe.
$ cat lorem.txt > MY_FIFO
<seems to be blocked>
And in the second terminal we will type the following.
$ cat MY_FIFO | tr 'a-zA-Z' 'A-Za-z'
lOREM IPSUM DOLOR SIT AMET, CONSECTETUR ADIPISCING ELIT.
dUIS VARIUS URNA ERAT, A FACILISIS MAURIS VEHICULA AT.
pHASELLUS IMPERDIET TRISTIQUE MAURIS SIT AMET POSUERE.
dUIS MOLESTIE, PURUS VEL SODALES POSUERE, LEO DOLOR TEMPOR ODIO,
VEL IMPERDIET QUAM ORCI VEL DIAM. cURABITUR FINIBUS DAPIBUS GRAVIDA.
dUIS GRAVIDA IACULIS CONDIMENTUM.
sED ULTRICIES NULLA LUCTUS, SOLLICITUDIN VELIT QUIS, MAXIMUS ARCU.
mORBI LACINIA LUCTUS URNA, NEC SUSCIPIT FELIS CONSEQUAT EGET.
vESTIBULUM NEC SODALES MAGNA, NEC PLACERAT VELIT.
mAURIS VOLUTPAT TELLUS NEQUE, QUIS BIBENDUM MAGNA TINCIDUNT A.
mAECENAS FAUCIBUS SCELERISQUE ENIM SOLLICITUDIN MOLESTIE.
nUNC MAURIS NIBH, SEMPER SIT AMET TELLUS EU, AUCTOR EGESTAS ERAT.
nUNC NON PHARETRA DIAM. pRAESENT NEC LUCTUS METUS.
pELLENTESQUE IN TURPIS NULLA.
mAURIS VEHICULA CONSEQUAT NISL, ET ELEMENTUM NUNC DICTUM AT.
sED FRINGILLA LUCTUS TINCIDUNT.
The command in the second window will execute right away printing the result we had the previous time. If you go and check the terminal window where we run the “cat” command you will see that is no longer blocked.
The process is no longer blocked and is, in fact, done.
Now let’s do it the other way round. In the second terminal we type the following command.
$ wc -l MY_FIFO
<seems to be blocked>
In the first terminal we type the following command.
$ cat lorem.txt > MY_FIFO
If you go back to the second terminal you will see an output like the following.
$ wc -l MY_FIFO
16 MY_FIFO
Some details
You might have observed that when certain commands interact with a FIFO file, either by sending or receiving data, they appear to “hang” or become blocked.
This happens because of the way FIFO files operate. When a process (such as a command or program) opens a FIFO file to write data, it remains blocked until another process opens the file on the other end to read from it. Similarly, when a process opens a FIFO file to read data, it remains blocked until another process writes data to the file.
This blocking mechanism is enforced by the kernel to ensure that data written to the FIFO isn’t wasted—there must be a recipient actively reading it.
Summary
I/O redirection in Bash is a powerful feature that allows users to manipulate file descriptors (FDs) to control the flow of data between commands, files, and scripts. Standard file descriptors include Standard Input (FD 0), Standard Output (FD 1), and Standard Error (FD 2), which are used for reading, writing, and error handling, respectively. Redirection operators such as “>”, “>>”, “<”, and “2>” provide the ability to reroute input and output, enabling tasks like writing command outputs to files, appending data, or redirecting errors to a separate location. Additionally, the “tee” command allows duplicating output to multiple destinations, such as files and standard output, simultaneously.
Redirections can be used with individual commands, blocks of code, and control structures like loops and conditionals. For example, you can redirect input and output for a block of commands enclosed in curly braces (“{}”), or for loop constructs like “while”, “for”, and “until”. This flexibility makes it possible to combine redirections and logic, such as redirecting input from a file and outputting results to another file while processing the data with a loop. Redirections can also be appended after specific control structures (e.g., after “done” in loops), and they are interpreted by Bash itself before the command is executed.
Pipes (“|”) enable chaining commands, passing the standard output of one command as the standard input to the next. These “anonymous pipes” are ephemeral and only exist while commands are running. In contrast, Named Pipes (or FIFOs) are permanent, system-level constructs created with the “mkfifo” command. FIFOs allow bi-directional communication between processes, unlike anonymous pipes, which are unidirectional. Named Pipes require a process on both ends to avoid blocking, ensuring data is read or written only when there is an active counterpart.
Finally, the “PIPESTATUS” array captures the exit statuses of all commands in a pipeline, making it easier to debug complex scripts. This array must be read immediately after the pipeline to capture accurate statuses. Together, redirections, pipes, and Named Pipes offer versatile tools for building efficient and modular Bash scripts, allowing users to manage data flow between commands and processes effectively.
“With redirections and pipes, you’re not just running commands; you’re orchestrating a symphony of data.”
References
- https://catonmat.net/bash-one-liners-explained-part-three
- https://subscription.packtpub.com/book/networking-and-servers/9781785286216/8/ch08lvl1sec67/piping-the-output-of-a-loop-to-a-linux-command
- https://thoughtbot.com/blog/input-output-redirection-in-the-shell
- https://tldp.org/LDP/abs/html/io-redirection.html
- https://unix.stackexchange.com/questions/56065/where-to-place-a-bash-shell-redirection-for-a-command
- https://www.geeksforgeeks.org/input-output-redirection-in-linux/
- https://www.gnu.org/software/bash/manual/html_node/Redirections.html
1. Comma-Separated Values file.↩
2. Check https://linuxhandbook.com/seq-command/ or https://linux.die.net/man/1/seq for more information.↩